
How to Use SENSORY REGULATION TOOLKIT
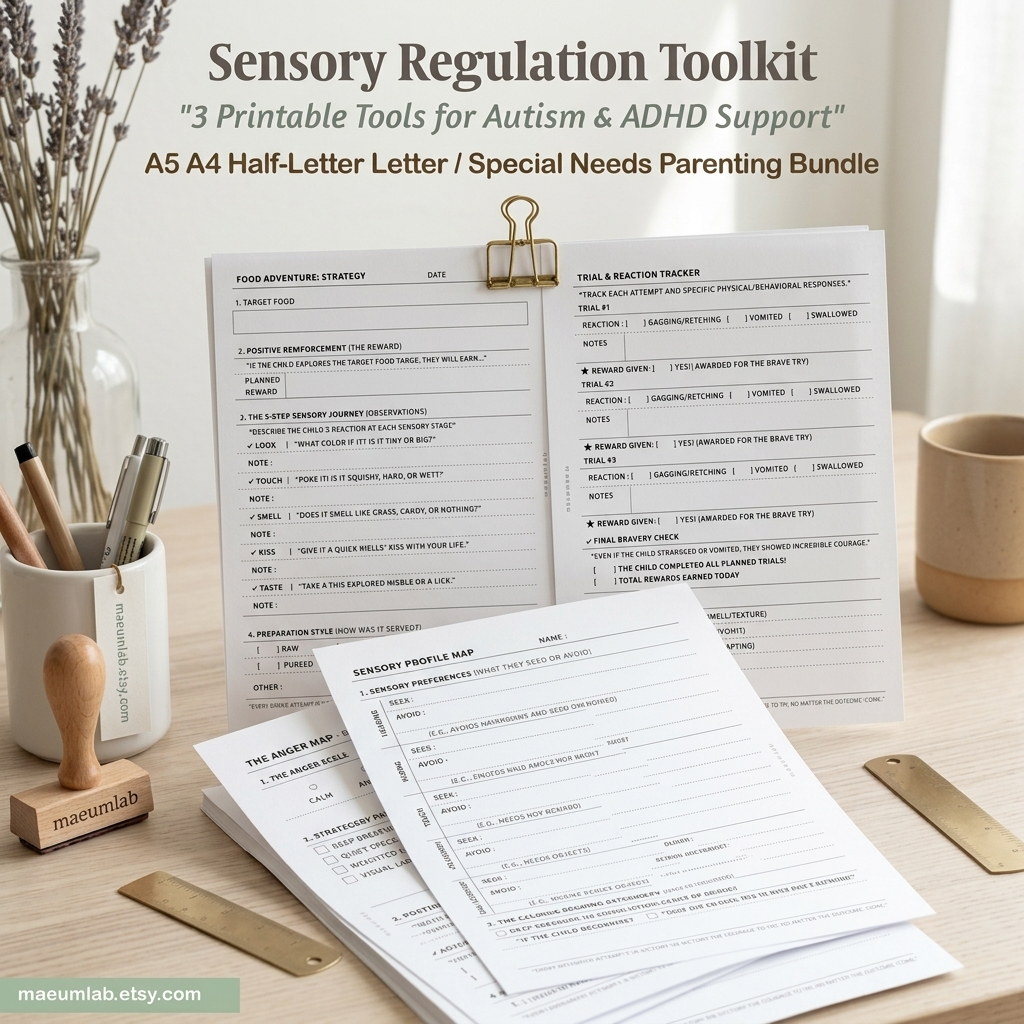
Observe • Respond • Support • Reflect
Every child experiences sensory input differently. Sounds, textures, environments, transitions, food, and everyday activities can sometimes feel comfortable — and at other times feel overwhelming or difficult.
The Sensory Regulation Toolkit is designed to help parents and caregivers notice those patterns, prepare supportive strategies, and reflect on what helps their child feel more comfortable and regulated.
This toolkit is not about forcing a child to tolerate discomfort or complete an activity.
Instead, use it to:
- Notice sensory preferences, triggers, and responses
- Prepare support before challenging situations
- Explore new experiences gradually
- Record strategies that helped
- Recognize effort and small steps
- Learn what may work differently next time
HOW TO USE THIS TOOLKIT
You don’t need to use every page at once.
Choose the tool that matches the situation:
Food Adventure
For gently exploring unfamiliar foods and recording sensory responses.
Brave Outing Strategy
For preparing for potentially challenging environments or outings.
Anger & Sensory Regulation
For noticing signs of rising overwhelm, trying supportive regulation strategies, and reflecting afterward.
Start with observation, not expectation.
The goal isn’t a perfect response.
The goal is to better understand your child’s needs and build a collection of supports that work for them over time.
Small observations can lead to better support.
01 | FOOD ADVENTURE
Explore New Foods One Small Step at a Time
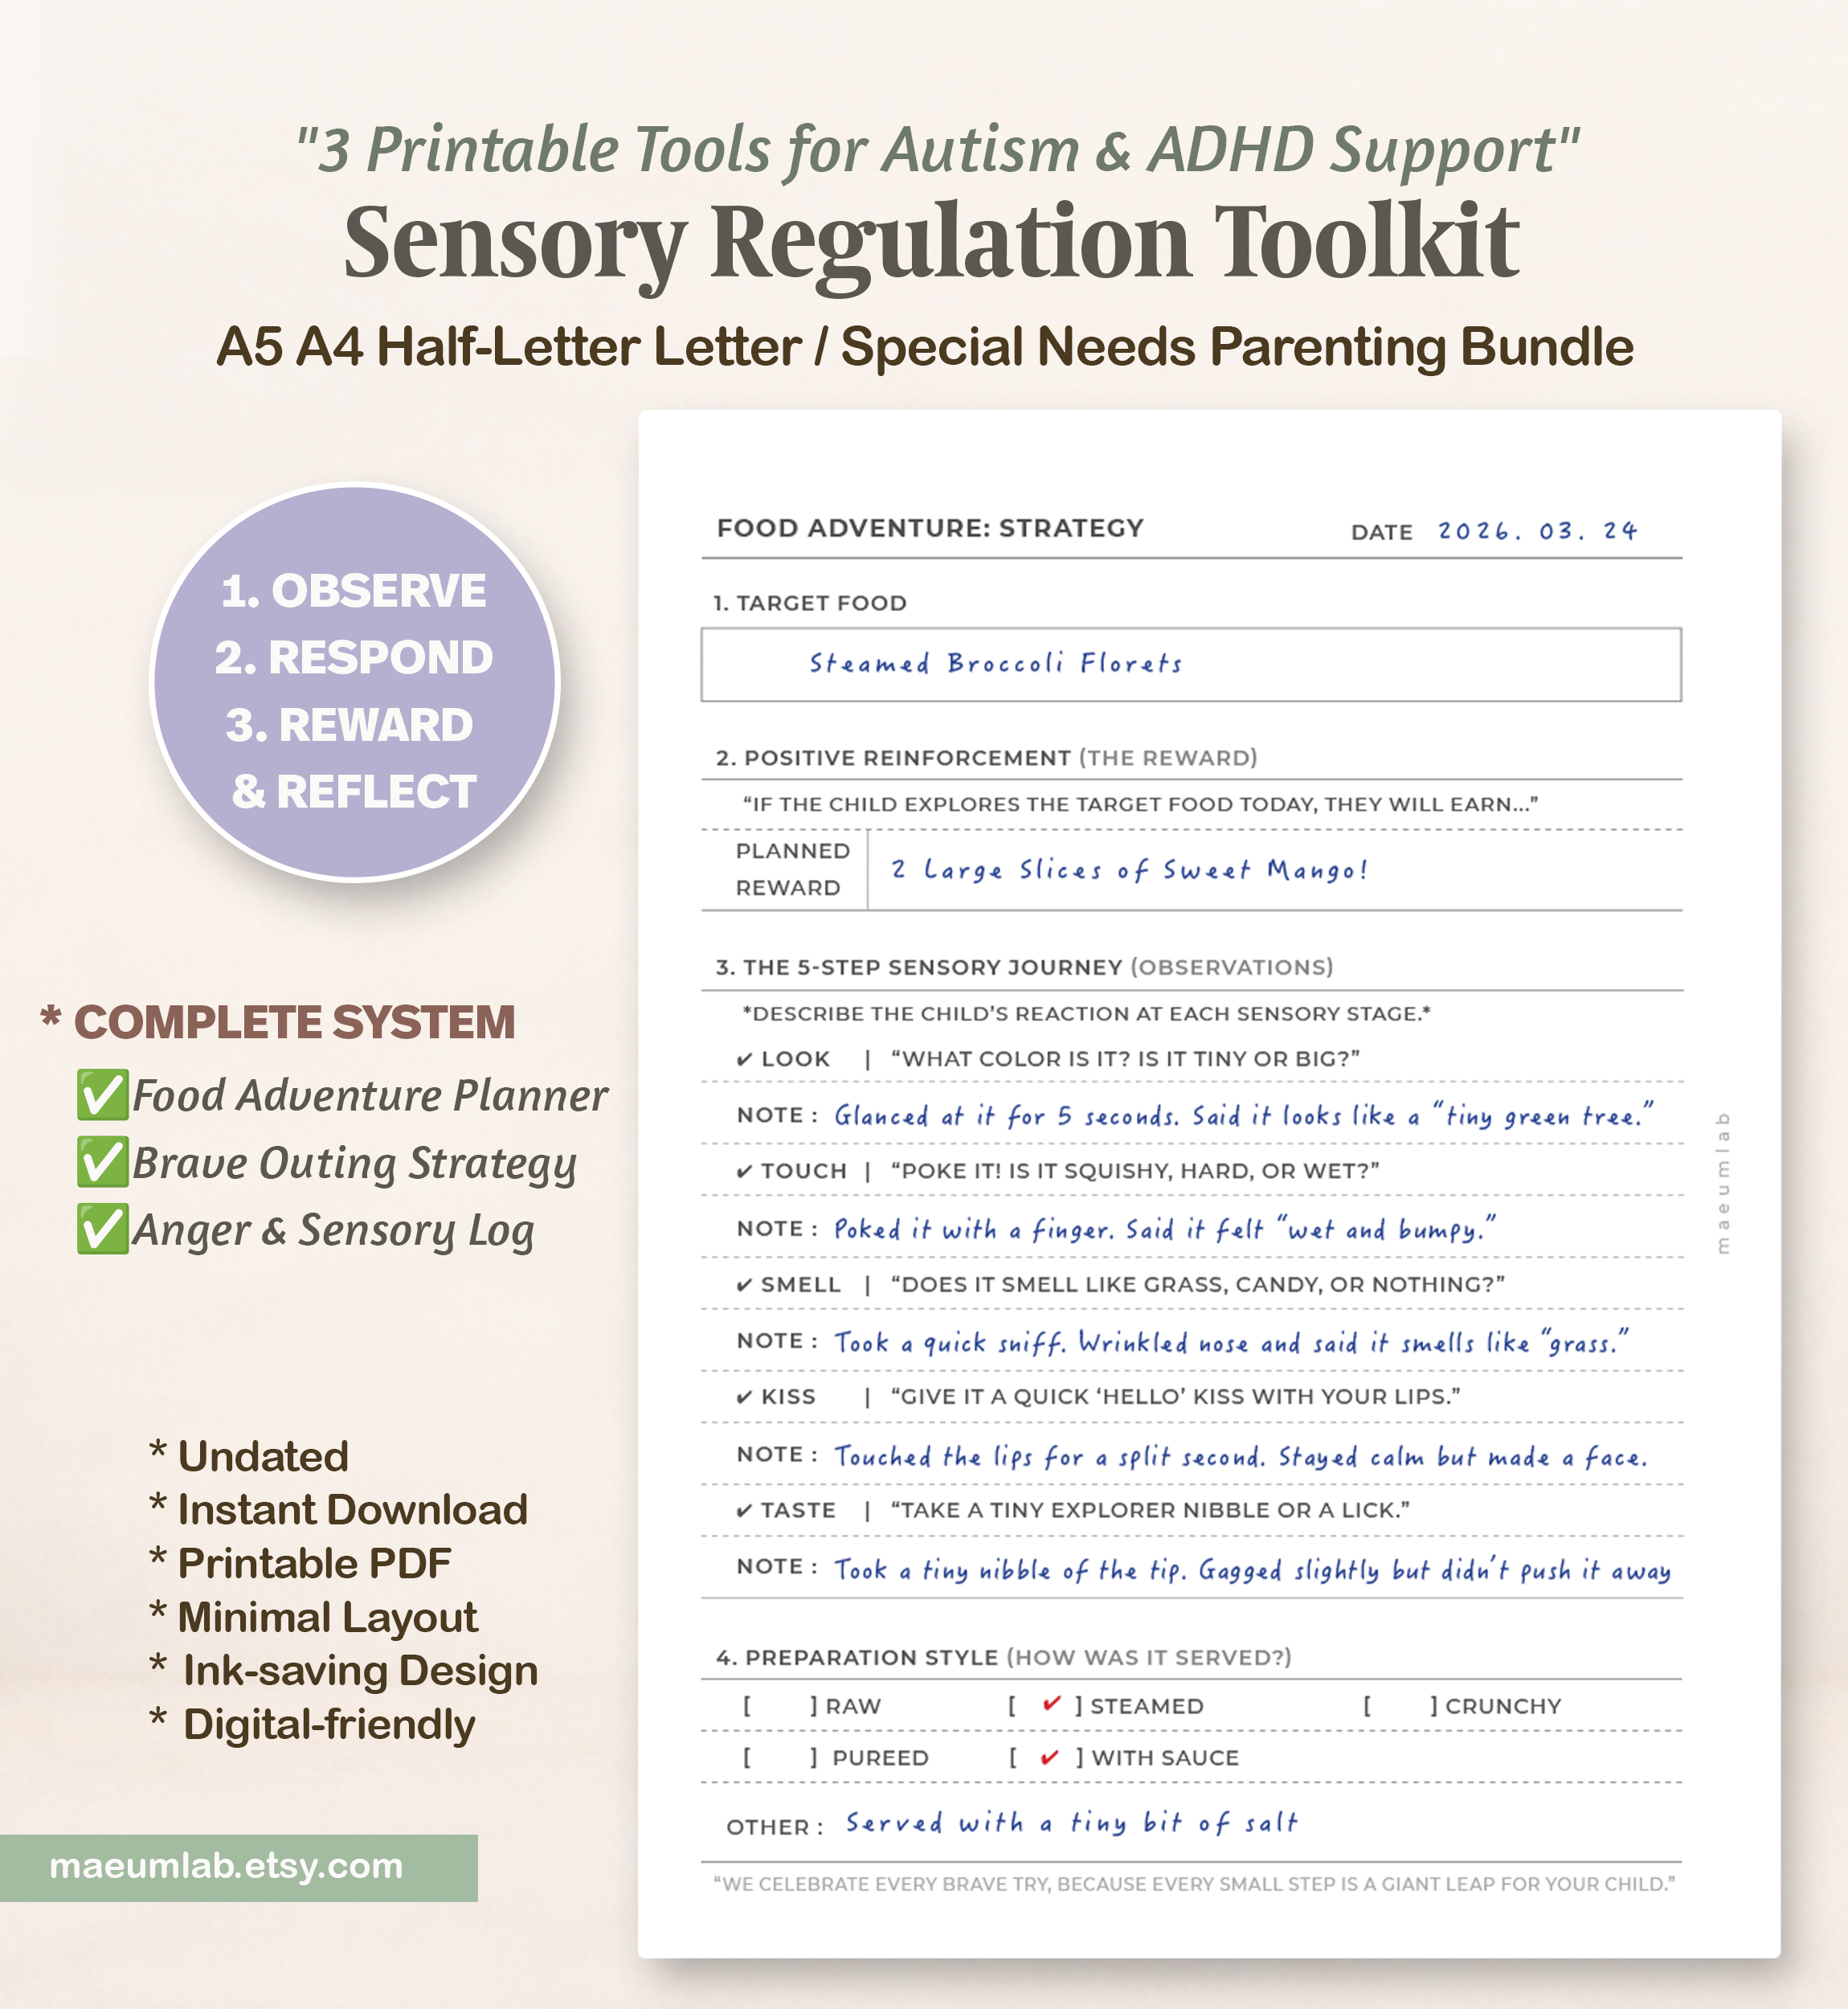
The Food Adventure page helps you introduce or explore a food without making eating the only measure of success.
A child may look at, touch, smell, or briefly taste a food before feeling ready to take a bite. Use this page to notice each step and learn which textures, smells, tastes, and preparation styles feel easier or harder.
1. CHOOSE THE TARGET FOOD
Write down one food to explore.
Example:
Steamed broccoli florets
Choose just one food at a time so the experience stays simple and easy to observe.
2. CHOOSE POSITIVE REINFORCEMENT
Decide ahead of time how you will acknowledge participation or a brave attempt.
Example:
Two slices of favorite mango after exploring the broccoli.
The goal is to recognize trying and exploring, not to pressure the child to finish the food.
3. FOLLOW THE 5-STEP SENSORY JOURNEY
Move through the steps only as far as the child is comfortable.
LOOK — Notice the color, shape, or size.
TOUCH — Explore how it feels.
SMELL — Notice the scent.
KISS — Briefly touch the food to the lips, if comfortable.
TASTE — Try a tiny lick or bite, if the child is ready.
Record reactions or observations beside each step.
It’s okay to stop at any stage.
4. RECORD THE PREPARATION STYLE
Check how the food was served:
Raw • Steamed • Crunchy • Pureed • With Sauce • Other
Preparation can make a big difference. A food that feels difficult in one form may feel completely different when prepared another way.
WHAT TO NOTICE
Over several attempts, look for patterns:
- Which sensory step feels easiest?
- Where does discomfort begin?
- Does preparation change the response?
- Are certain textures or smells harder?
- What helps the child stay comfortable?
- Is the child becoming more curious or willing to explore?
REMEMBER
Progress doesn’t have to mean eating the food.
Looking, touching, smelling, or calmly being near a new food can also be meaningful information and a step forward.
Observe the response. Respect the limit. Celebrate the attempt.
02 | TRIAL & REACTION TRACKER
Track Responses. Notice Patterns. Adjust the Approach.
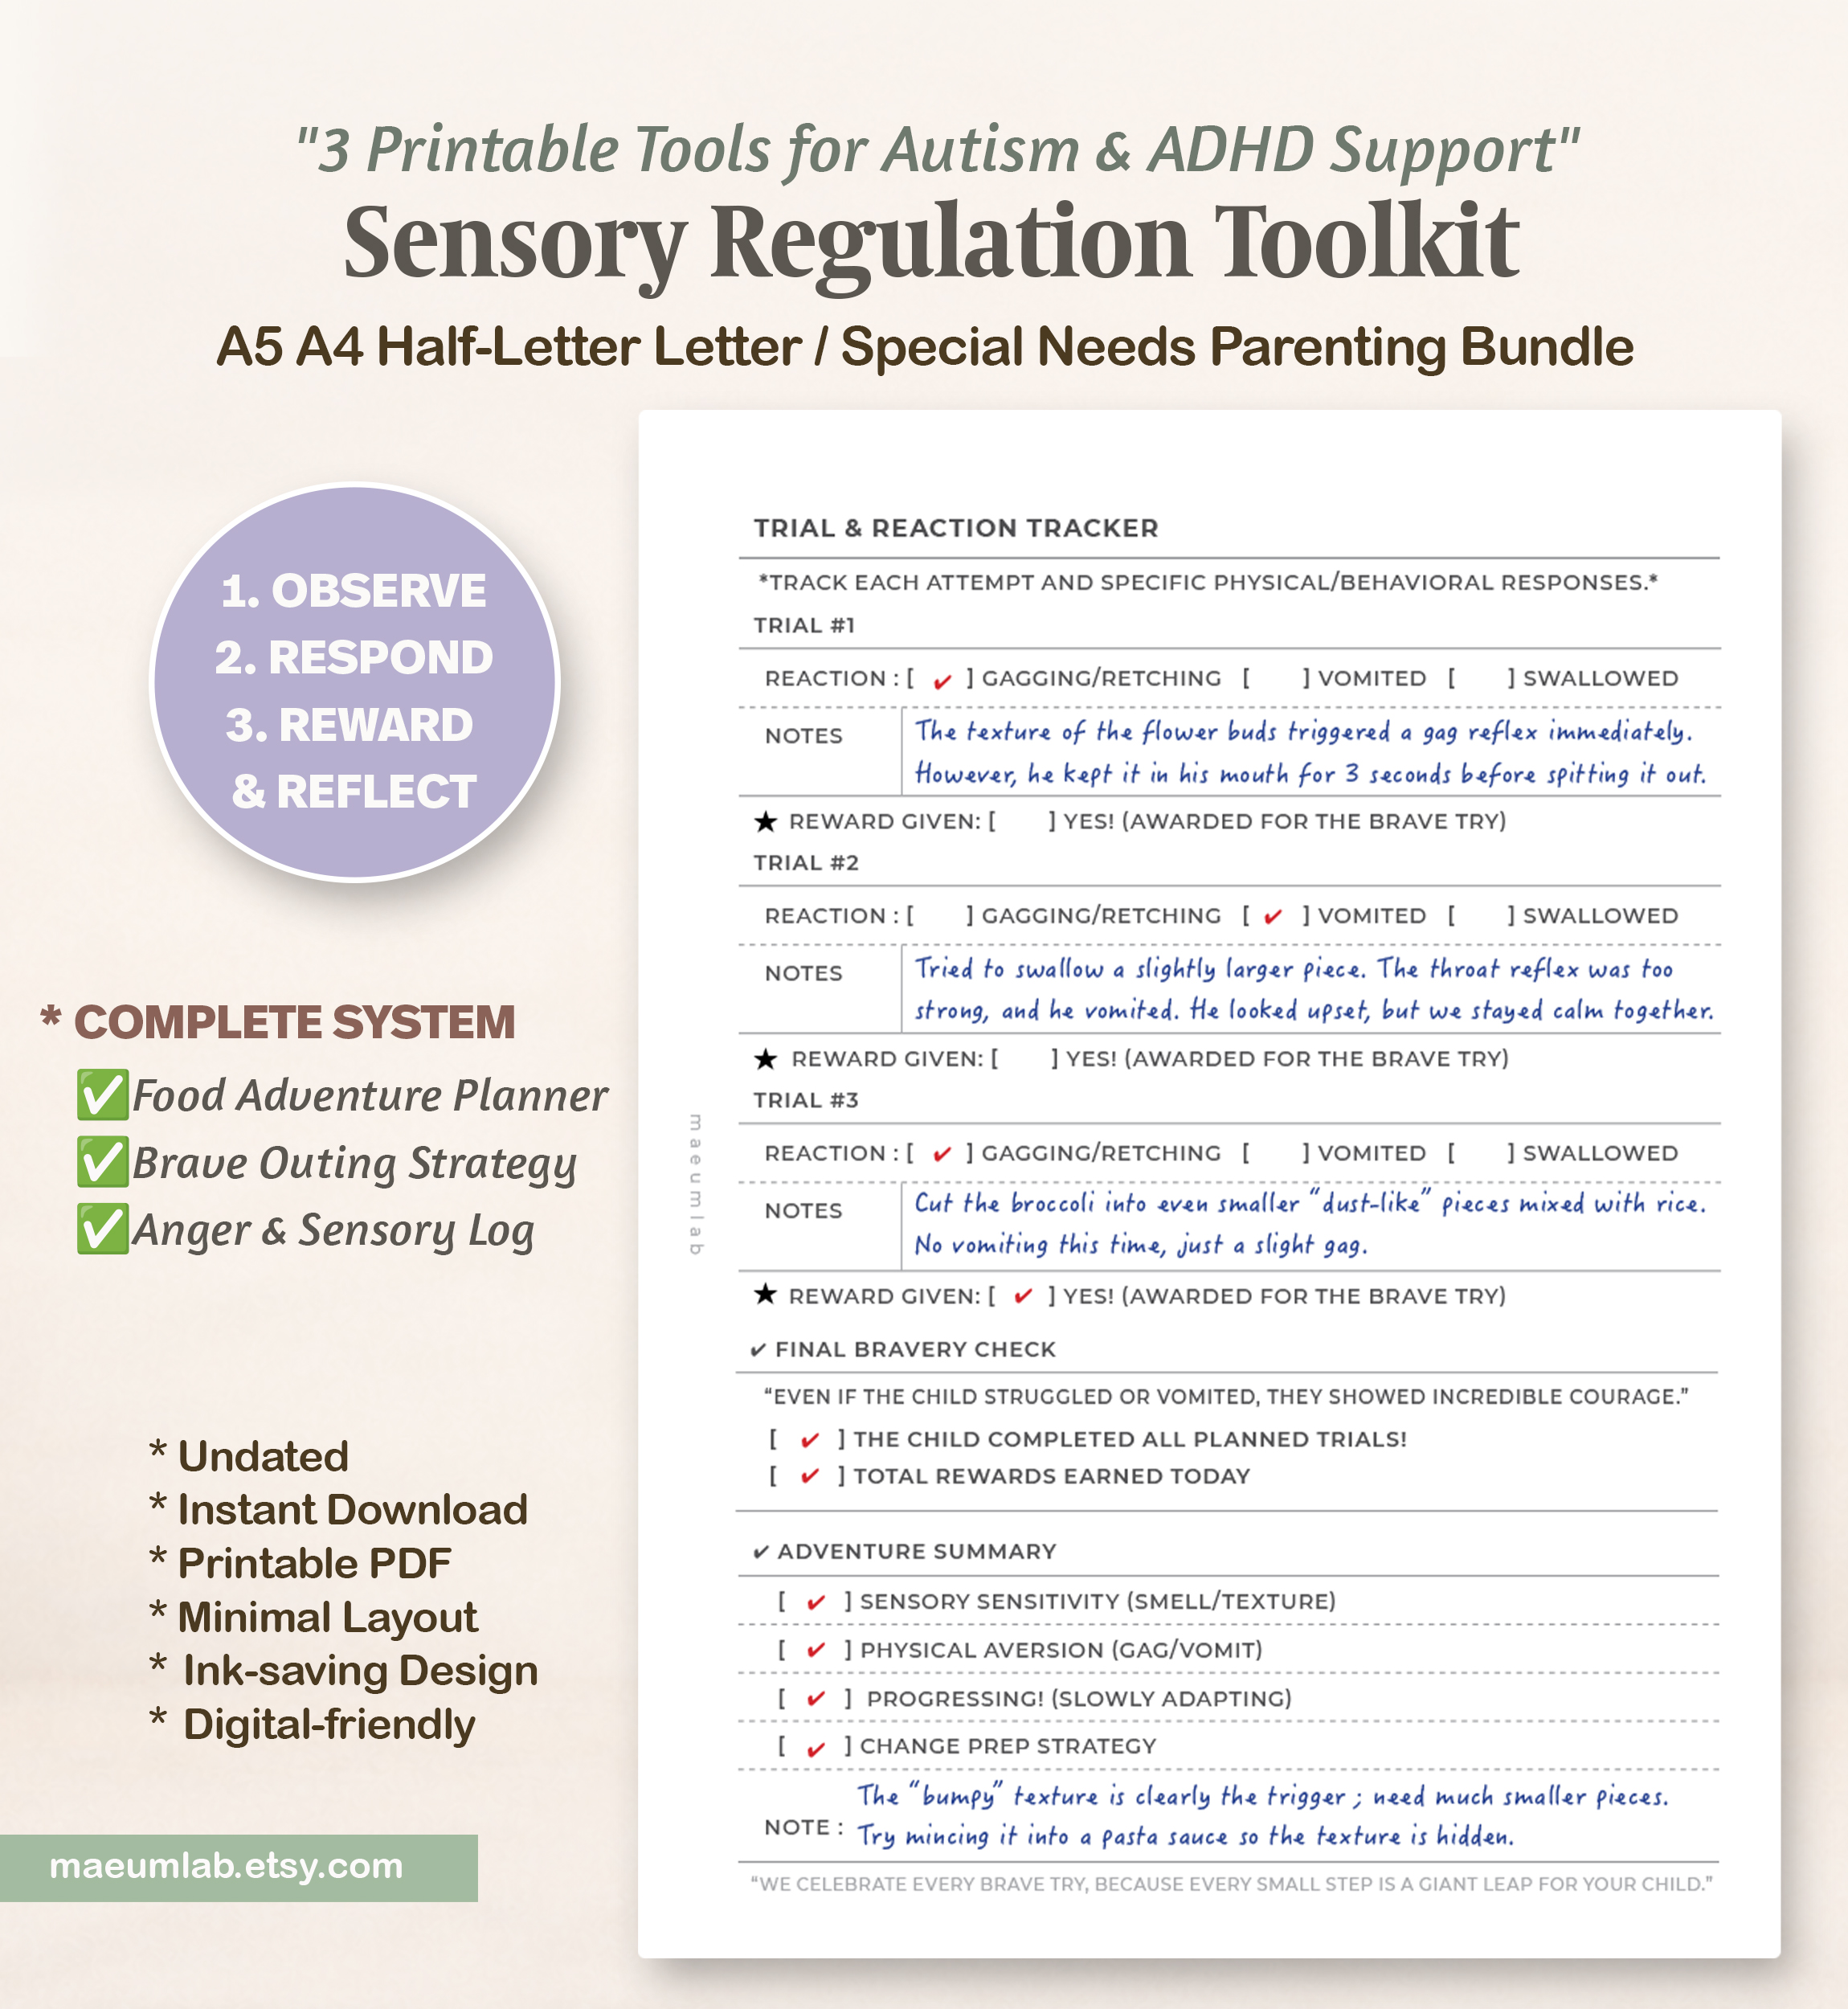
Use the Trial & Reaction Tracker to record what happened during each food exploration attempt.
The purpose is not to encourage repeated tasting when a child is distressed. Instead, use the tracker to notice sensory and physical responses and learn when the approach, preparation, or level of exposure may need to change.
1.RECORD EACH TRIAL
For each attempt, check the response you observed and add a short note about what happened.
You might record:
- The texture or preparation offered
- How much interaction occurred
- Signs of comfort or discomfort
- Whether the child wanted to continue or stop
- Anything that seemed to make the experience easier or harder
There is no need to complete all three trials in one session.
2.RESPOND TO THE CHILD’S SIGNALS
If the child shows significant discomfort, distress, gagging, retching, or vomiting, stop the food exploration and respond to their needs.
The tracker is there to help you observe patterns — not push past physical or sensory limits.
3.RECOGNIZE PARTICIPATION
Use Reward Given to record positive reinforcement when appropriate.
Recognition can be for participating in an agreed-upon step — looking, touching, smelling, or another comfortable form of exploration.
Success does not have to mean swallowing the food.
4.COMPLETE THE ADVENTURE SUMMARY
At the end of the session, use the summary to note what you learned.
Look for patterns such as:
Sensory Sensitivity — Did smell, taste, or texture seem difficult?
Physical Aversion — Was there a strong physical response?
Progressing — Did any part of the experience become easier?
Change Prep Strategy — Could a different texture, temperature, size, or preparation be worth considering another time?
Add a short note about anything you want to remember for the next experience.
IMPORTANT
If a child repeatedly gags, vomits, has difficulty swallowing, experiences pain, or has ongoing difficulty eating, pause food exploration and discuss the concern with an appropriate healthcare professional.
REMEMBER
The goal is understanding, not completion.
Observe what happened. Respect the child’s response. Use what you learn to make future experiences feel safer and more manageable.
03 | SENSORY PROFILE MAP
Notice What They Seek. Notice What They Avoid.
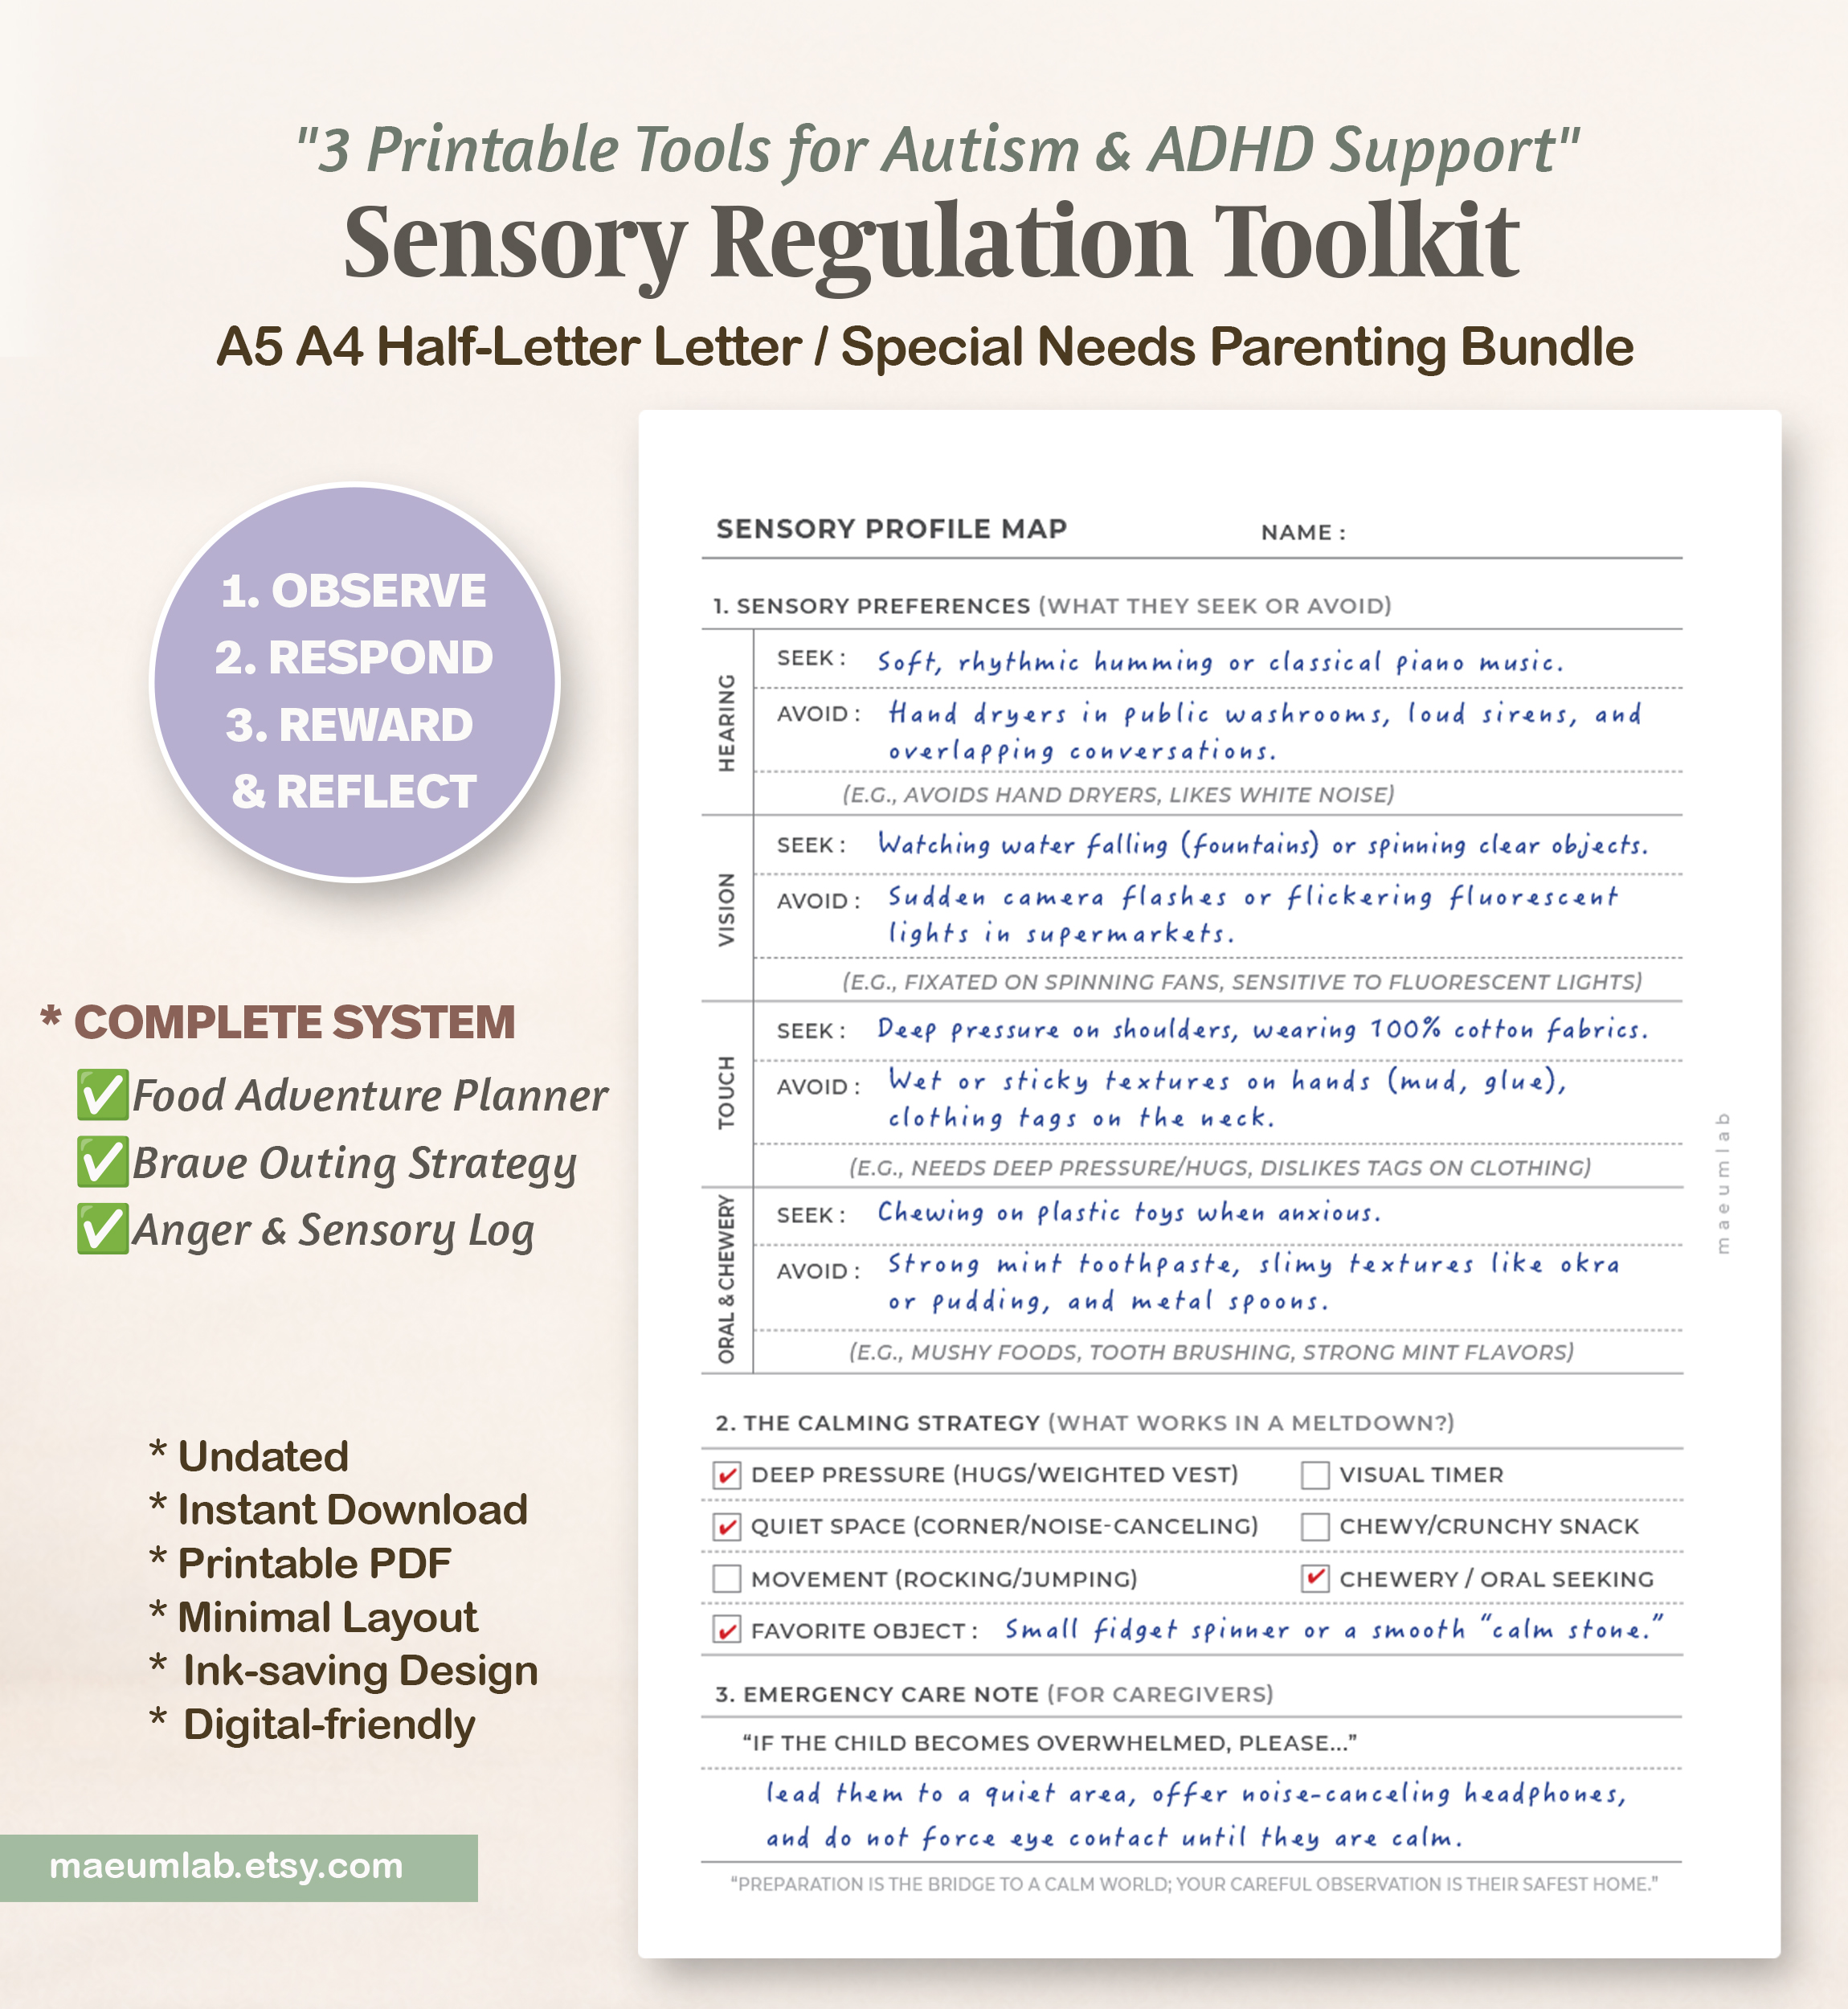
The Sensory Profile Map helps you record patterns in how your child responds to everyday sensory input.
Use observations from home, school, outings, meals, and daily routines to build a clearer picture of what your child tends to seek, enjoy, avoid, or find overwhelming.
This page does not need to be completed all at once. Add to it as you notice new patterns.
1.RECORD SENSORY PREFERENCES
For each sensory area, write what your child tends to SEEK and AVOID.
HEARING
Notice responses to sounds, voices, music, appliances, crowds, or unexpected noise.
Example:
SEEK: Soft rhythmic music
AVOID: Hand dryers and loud sirens
VISION
Notice responses to lighting, movement, colors, screens, or busy visual environments.
Example:
SEEK: Watching moving water
AVOID: Flickering fluorescent lights
TOUCH
Notice preferences involving clothing, physical contact, temperature, pressure, or textures.
Example:
SEEK: Deep pressure
AVOID: Wet or sticky textures
ORAL & CHEWERY
Notice patterns involving chewing, food textures, toothpaste, oral input, or objects the child may seek with their mouth.
Example:
SEEK: Chewing when anxious
AVOID: Strong mint flavors or mushy textures
2.IDENTIFY CALMING STRATEGIES
Check the strategies you have observed helping your child feel more comfortable or regulated.
These might include:
- Deep pressure
- Quiet space
- Movement
- Visual timer
- Appropriate chew/oral sensory tools
- A familiar or favorite object
Use Favorite Object to record a specific item that may provide comfort.
Example:
Small fidget spinner or smooth calming stone.
Not every strategy will work every time. Treat this section as a growing list of possibilities rather than a fixed prescription.
3.CREATE AN EMERGENCY CARE NOTE
Use this space to give another caregiver a short, practical description of what may help when your child becomes overwhelmed.
Keep the instructions simple and specific.
Example:
Guide them to a quiet area, offer noise-reducing headphones, reduce verbal demands, and give them space until they are ready to reconnect.
This can be especially useful for teachers, babysitters, relatives, or other caregivers who may not know the child’s sensory patterns yet.
UPDATE AS YOU LEARN
Sensory needs can vary with:
Environment • Fatigue • Stress • Hunger • Routine Changes • Illness • Time of Day
Come back to this page whenever you notice a new preference, trigger, or strategy that helps.
REMEMBER
The goal is not to eliminate sensory differences.
Observe the pattern. Reduce unnecessary discomfort. Support what helps.
04 | BRAVE OUTING STRATEGY
Prepare Before You Go. Support Along the Way.
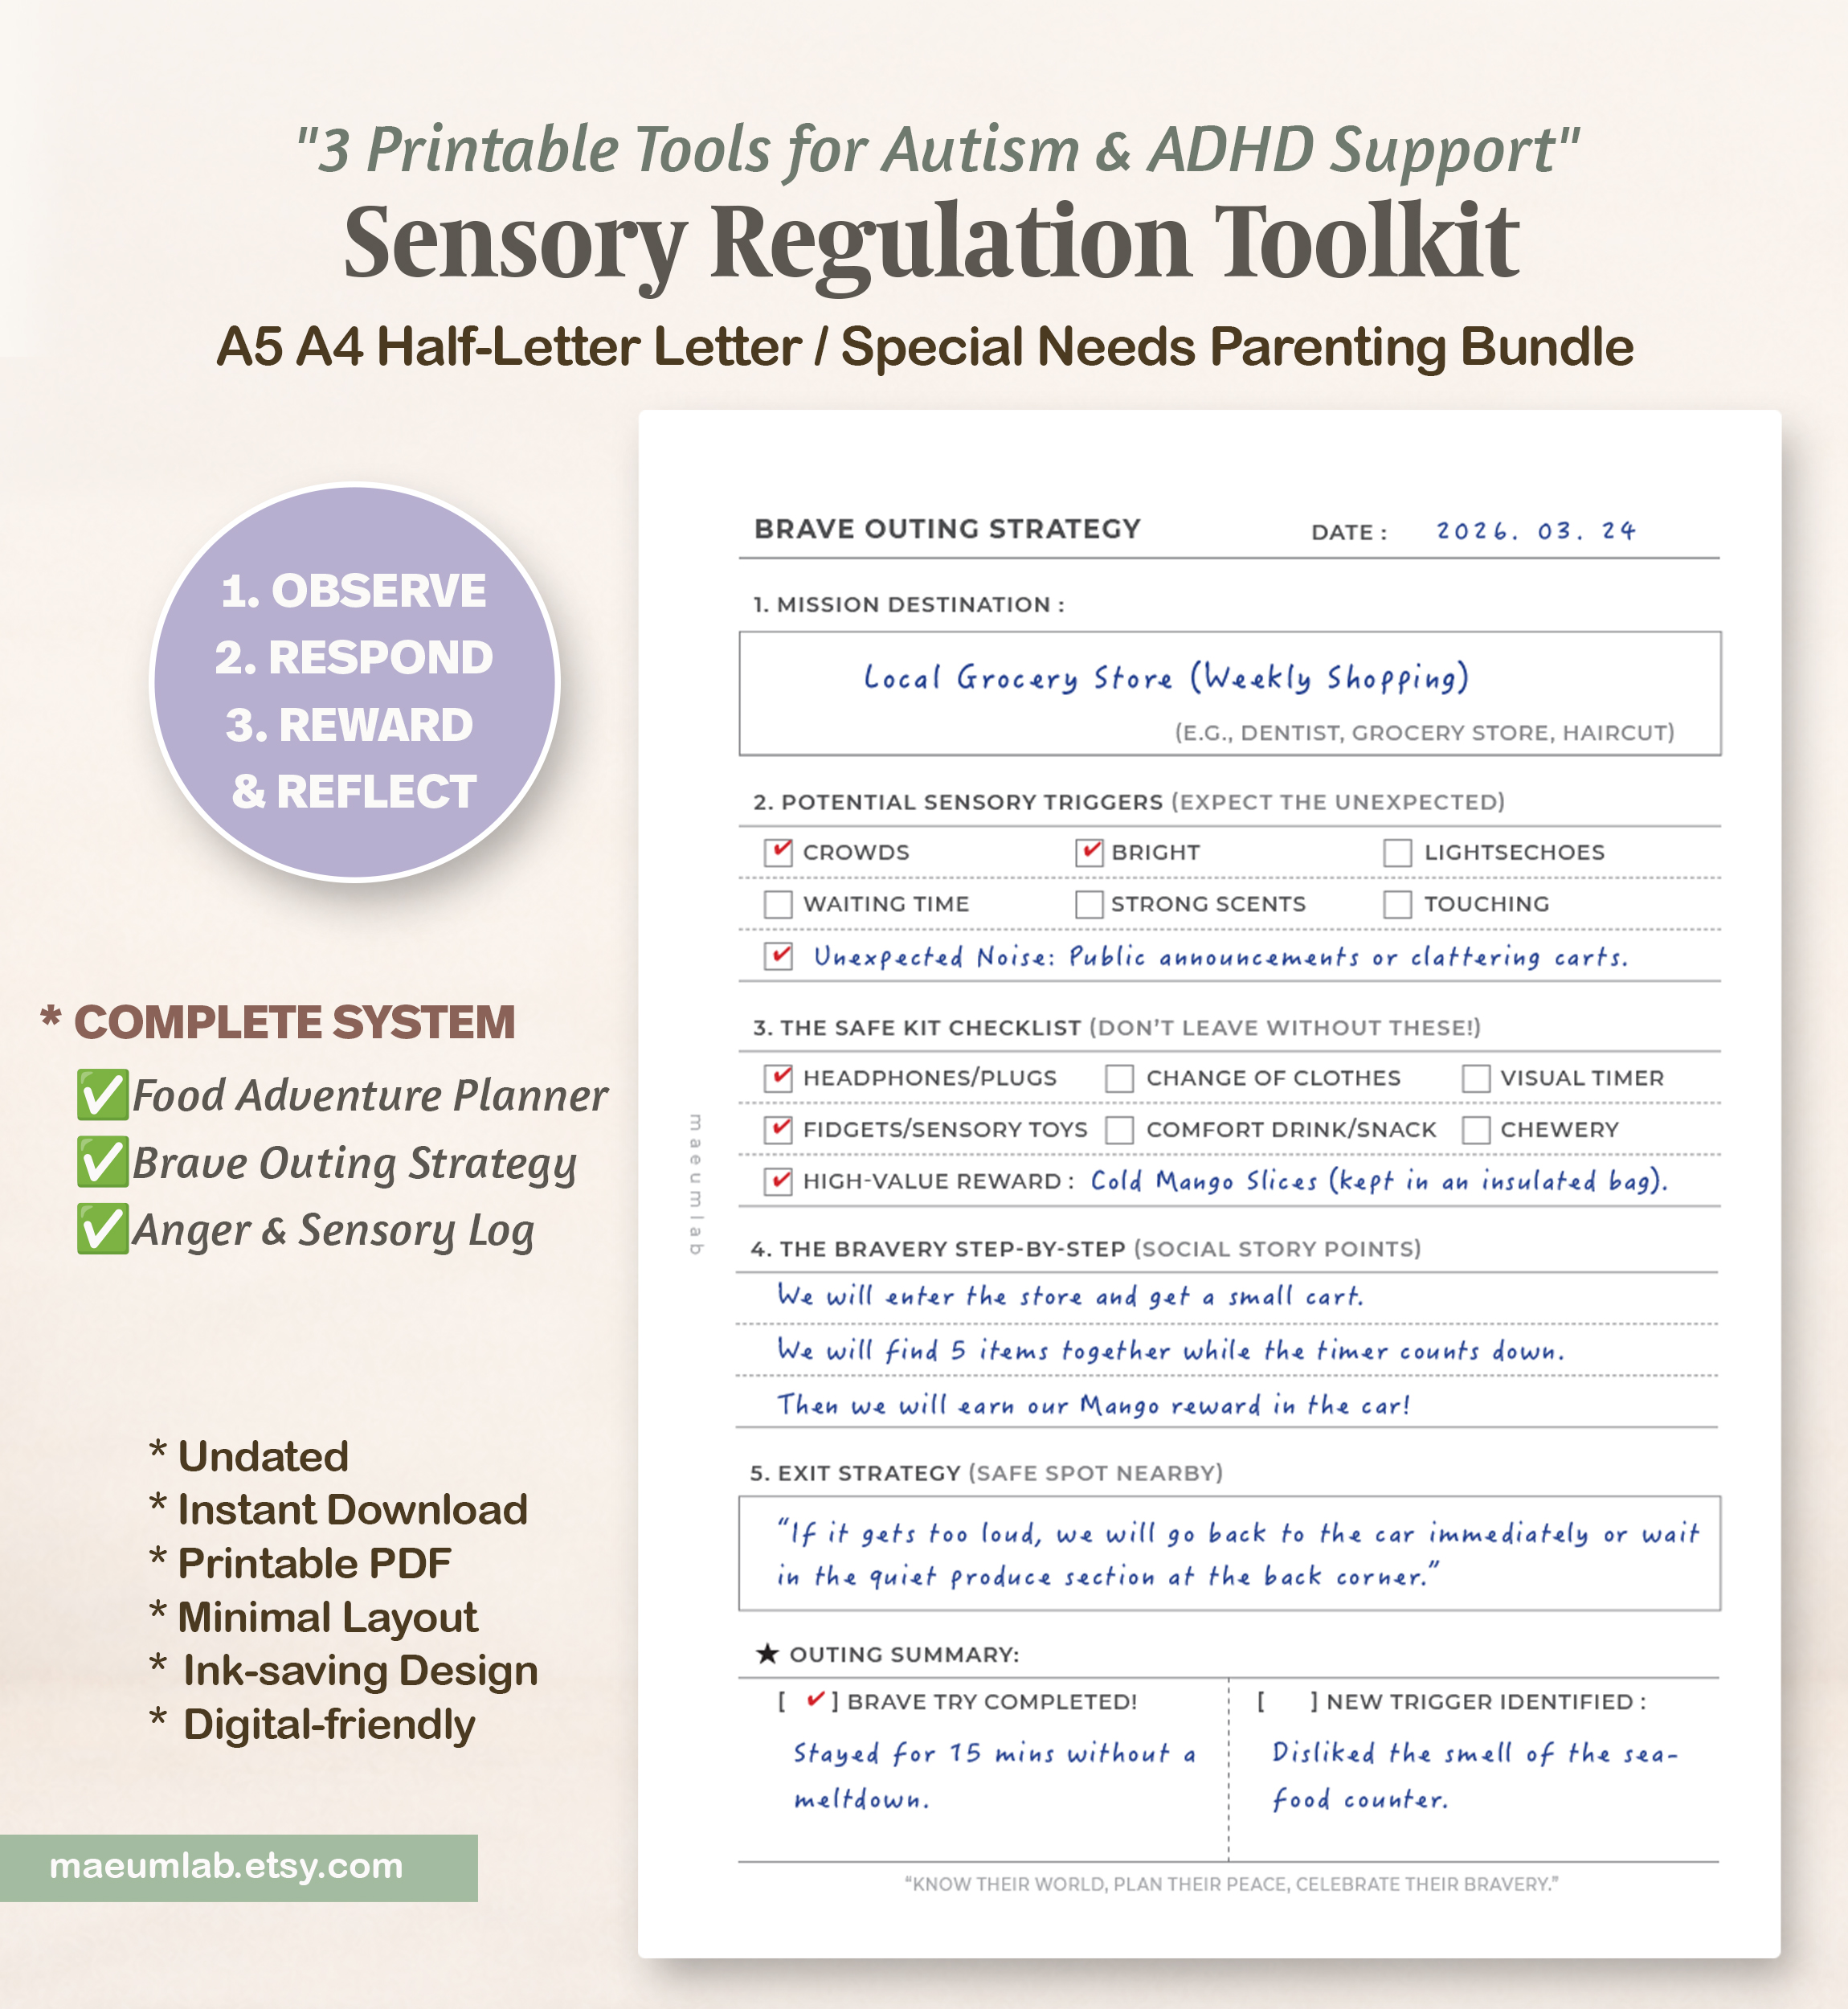
The Brave Outing Strategy helps you prepare for outings that may involve sensory challenges, waiting, unfamiliar environments, or unexpected changes.
Use what you already know from the Sensory Profile Map to anticipate possible challenges and prepare supports before leaving home.
The goal is not to make the child stay in an overwhelming situation.
The goal is to make the experience more predictable, supported, and manageable.
1.CHOOSE THE MISSION DESTINATION
Write down where you’re going and what the outing involves.
Example:
Local grocery store — weekly shopping
Knowing the purpose of the outing can help you decide how much time, preparation, and support may be needed.
2.ANTICIPATE POSSIBLE SENSORY TRIGGERS
Check anything that might make the environment more challenging.
For example:
- Crowds
- Crowds
- Bright lights
- Waiting
- Strong scents
- Unexpected sounds
- Physical contact
- Sudden changes
Add anything specific to your child.
You are not predicting that something will go wrong — you’re simply preparing for what might be difficult.
3.PACK THE SAFE KIT
Choose the supports that may make the outing easier.
This might include:
- Headphones or earplugs
- Fidget or sensory tools
- Visual timer
- Comfort drink or snack
- Change of clothes
- Appropriate chew/oral sensory tool
- Familiar comfort item
Bring only what is useful for your child.
4. CREATE A SIMPLE STEP-BY-STEP PLAN
Before the outing, write a few short steps describing what will happen.
Example:
First, we’ll enter the store and get a cart.
Next, we’ll find five items together.
Then we’ll check out and go back to the car.
Keep the steps concrete and predictable. You can review them with the child beforehand if that is helpful.
5. PLAN AN EXIT STRATEGY
Decide before you go what you can do if the environment becomes too much.
Example:
If it gets too loud, we’ll move to a quieter area or return to the car.
An exit strategy isn’t a failed outing.
Knowing there is a way to pause, leave, or reduce demands can make an outing feel safer from the beginning.
6. REFLECT AFTER THE OUTING
Use the Outing Summary to record what you learned.
Instead of asking only, “Did we finish?”, notice:
- What went better than expected?
- How long was the outing manageable?
- Which support helped?
- Was a new trigger discovered?
- Did you need to change the plan?
- What would you prepare differently next time?
REMEMBER
A successful outing can look different each time.
Sometimes success means completing the plan.
Sometimes it means trying part of it.
Sometimes it means recognizing overwhelm early and leaving.
Prepare the environment. Respect the signals. Adjust when needed.
05 | THE ANGER MAP
Look Beyond the Behavior. Notice What Happened Before.
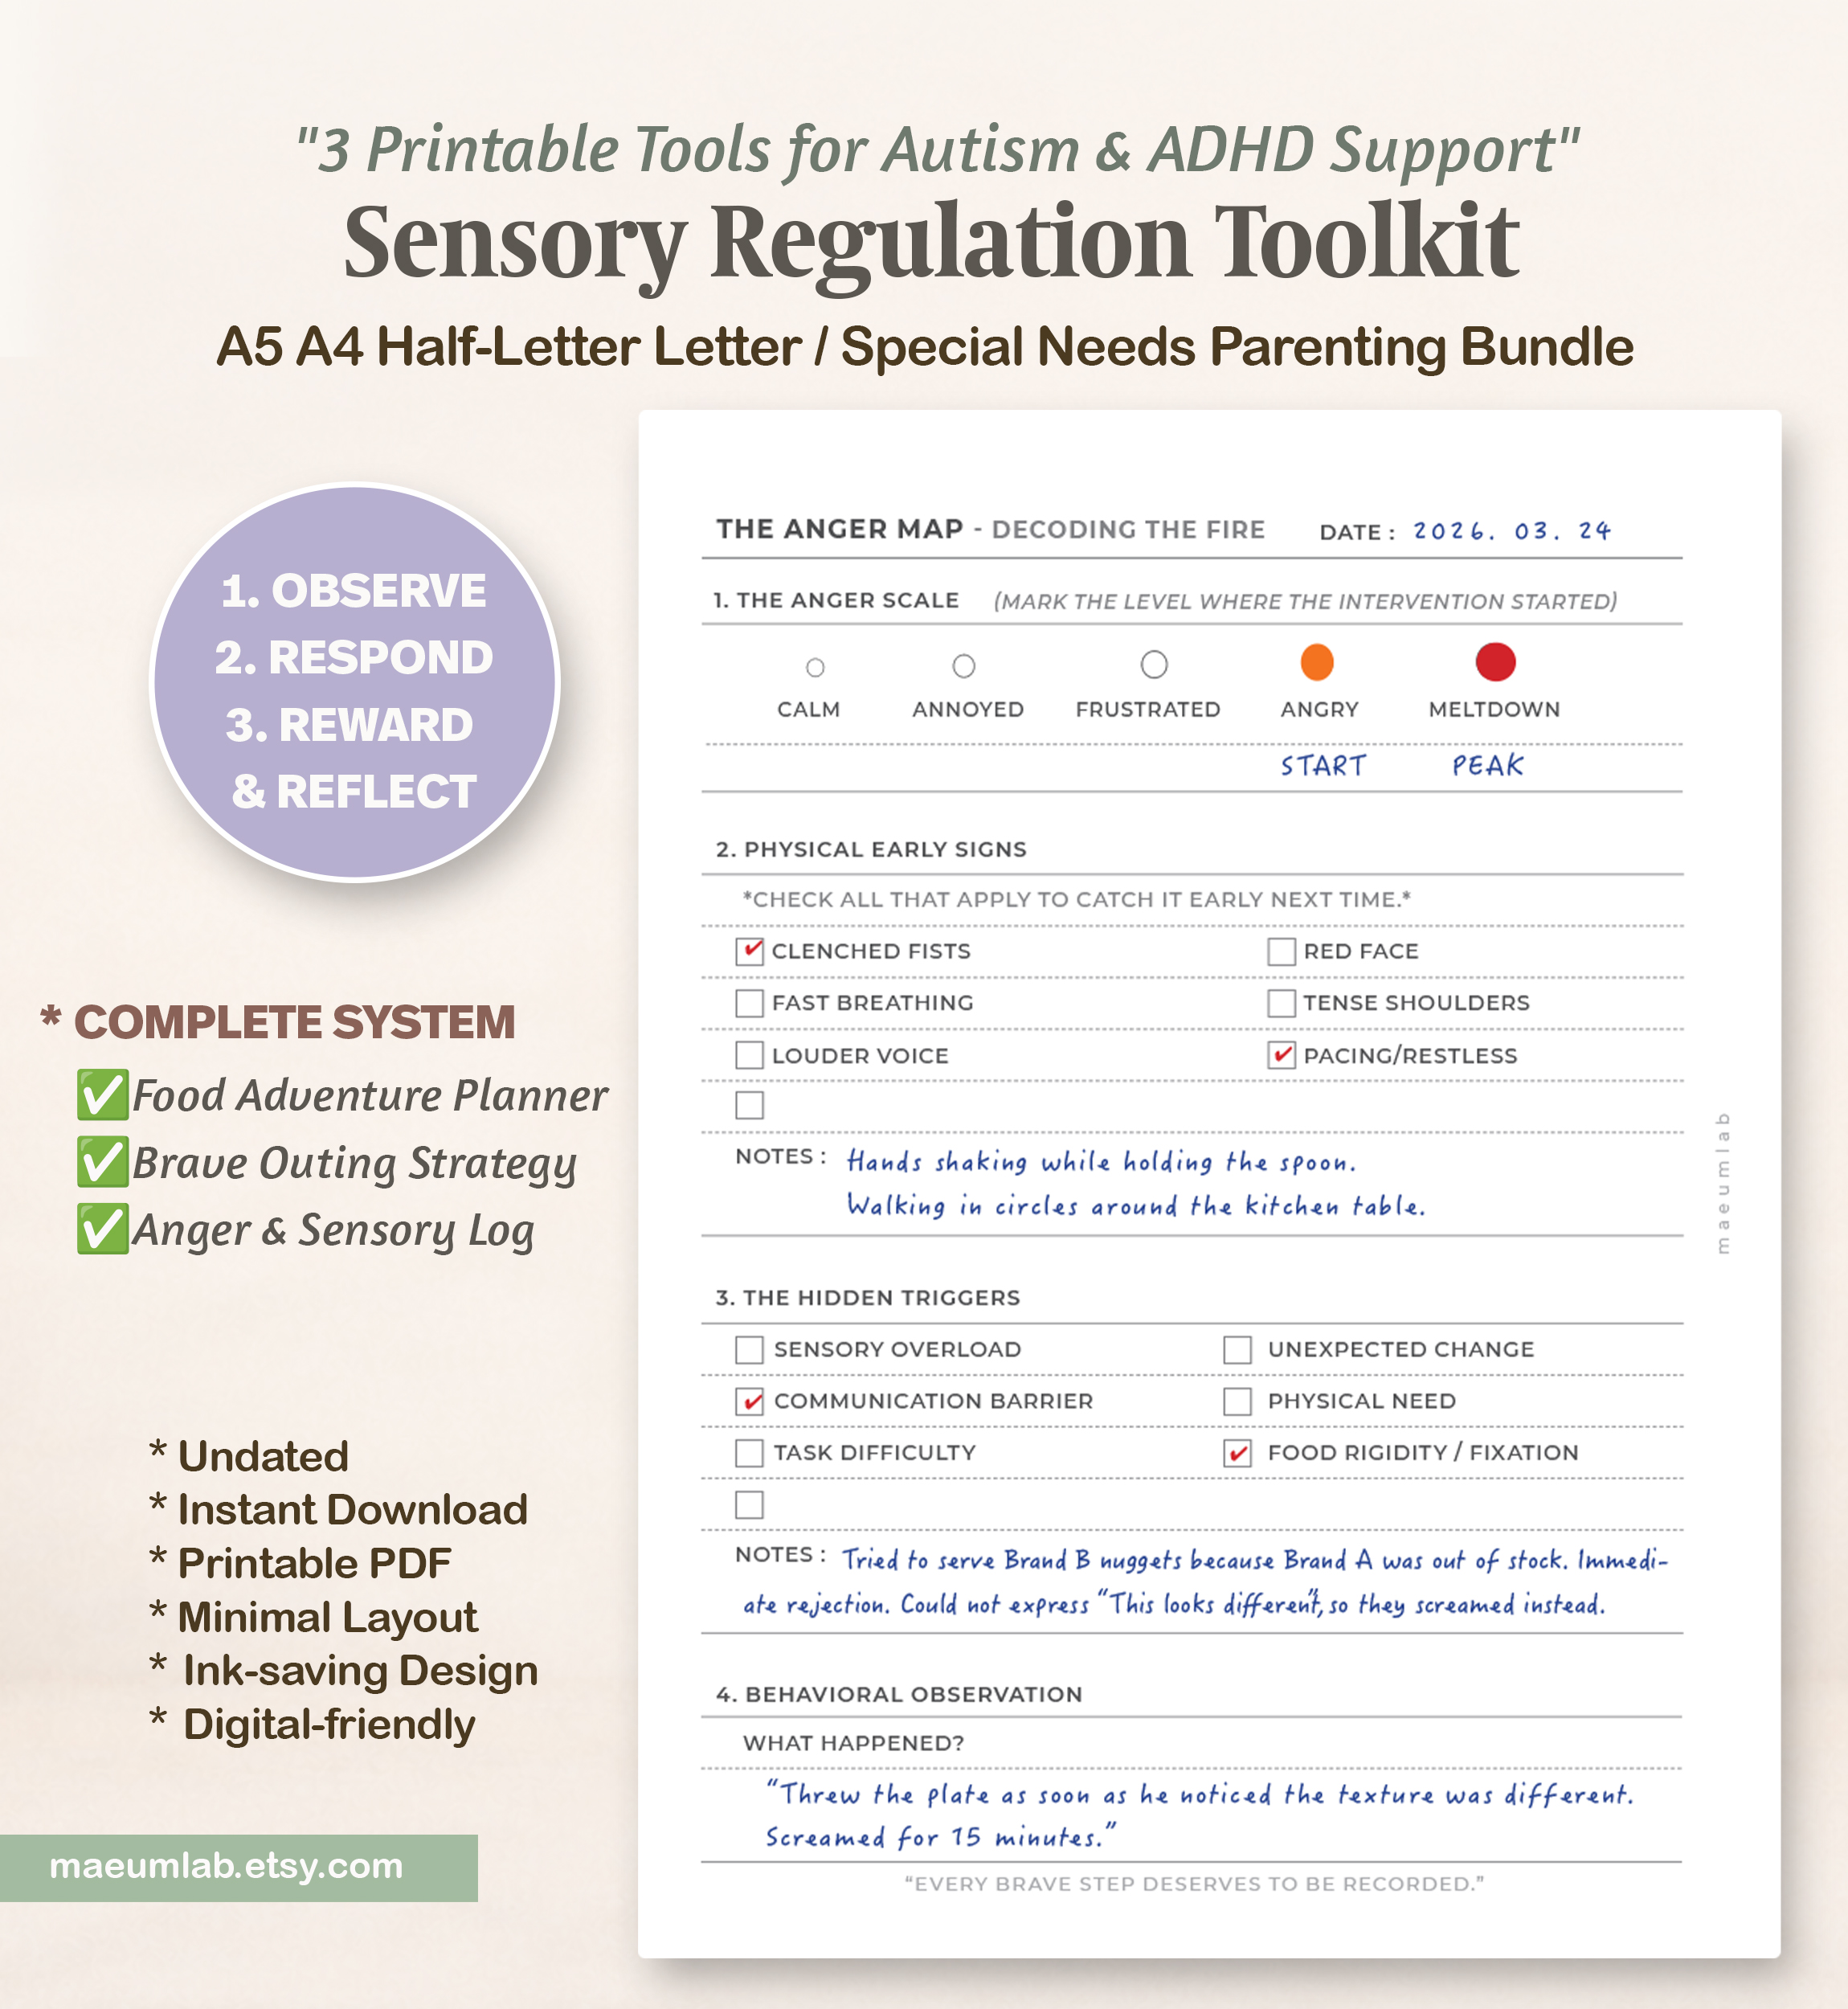
The Anger Map helps you look beneath an intense emotional or behavioral response and notice what may have contributed to it.
Instead of focusing only on what the child did, use this page to record early physical signs, possible triggers, and what was happening around them.
Over time, these observations may help you recognize patterns earlier and respond with support before overwhelm becomes more intense.
1.MARK THE ANGER SCALE
Mark the level where you first noticed that something was changing.
CALM → ANNOYED → FRUSTRATED → ANGRY → MELTDOWN
You can also note the highest level reached if that information is useful.
The purpose isn’t to judge the intensity of the reaction. It is to help you recognize when signs first became noticeable.
2. NOTICE PHYSICAL EARLY SIGNS
Check any physical or behavioral changes you noticed before or during the escalation.
These might include:
- Clenched fists
- Faster breathing
- Louder voice
- Red face
- Tense shoulders
- Pacing or restlessness
Use the blank space and Notes area for signs that are unique to your child.
Example:
Hands began shaking and they started walking repeatedly around the table.
Over time, these observations may become useful early signals that additional support is needed.
3. LOOK FOR POSSIBLE HIDDEN TRIGGERS
Consider what may have been making the situation harder.
Possible contributors include:
- Sensory overload
- Communication difficulty
- Task difficulty
- Unexpected change
- Physical needs
- Food rigidity or expectation
There may be more than one contributing factor — and sometimes the trigger won’t be obvious.
That’s okay.
Record what you observed rather than feeling that you have to identify one definite cause.
4. RECORD WHAT HAPPENED
Briefly describe the situation using neutral, observable language.
Instead of:
“They were being difficult.”
Try:
“The expected food was unavailable. When a different version was served, they pushed the plate away, began yelling, and moved away from the table.”
Focus on what you could see and hear, rather than assumptions about intention.
LOOK FOR PATTERNS OVER TIME
After several entries, review the pages together.
Ask:
- Are the same early signs appearing?
- Are certain environments more difficult?
- Do unexpected changes frequently come before escalation?
- Are communication difficulties involved?
- Are sensory demands building up beforehand?
- What seems to help when you notice the signs early?
These patterns can help you prepare support earlier in future situations.
REMEMBER
The behavior you see may be only one part of the story.
Notice the signals. Look for the need. Respond with support.
06 | THE RECOVERY PATH
Support the Recovery. Learn What Helps.
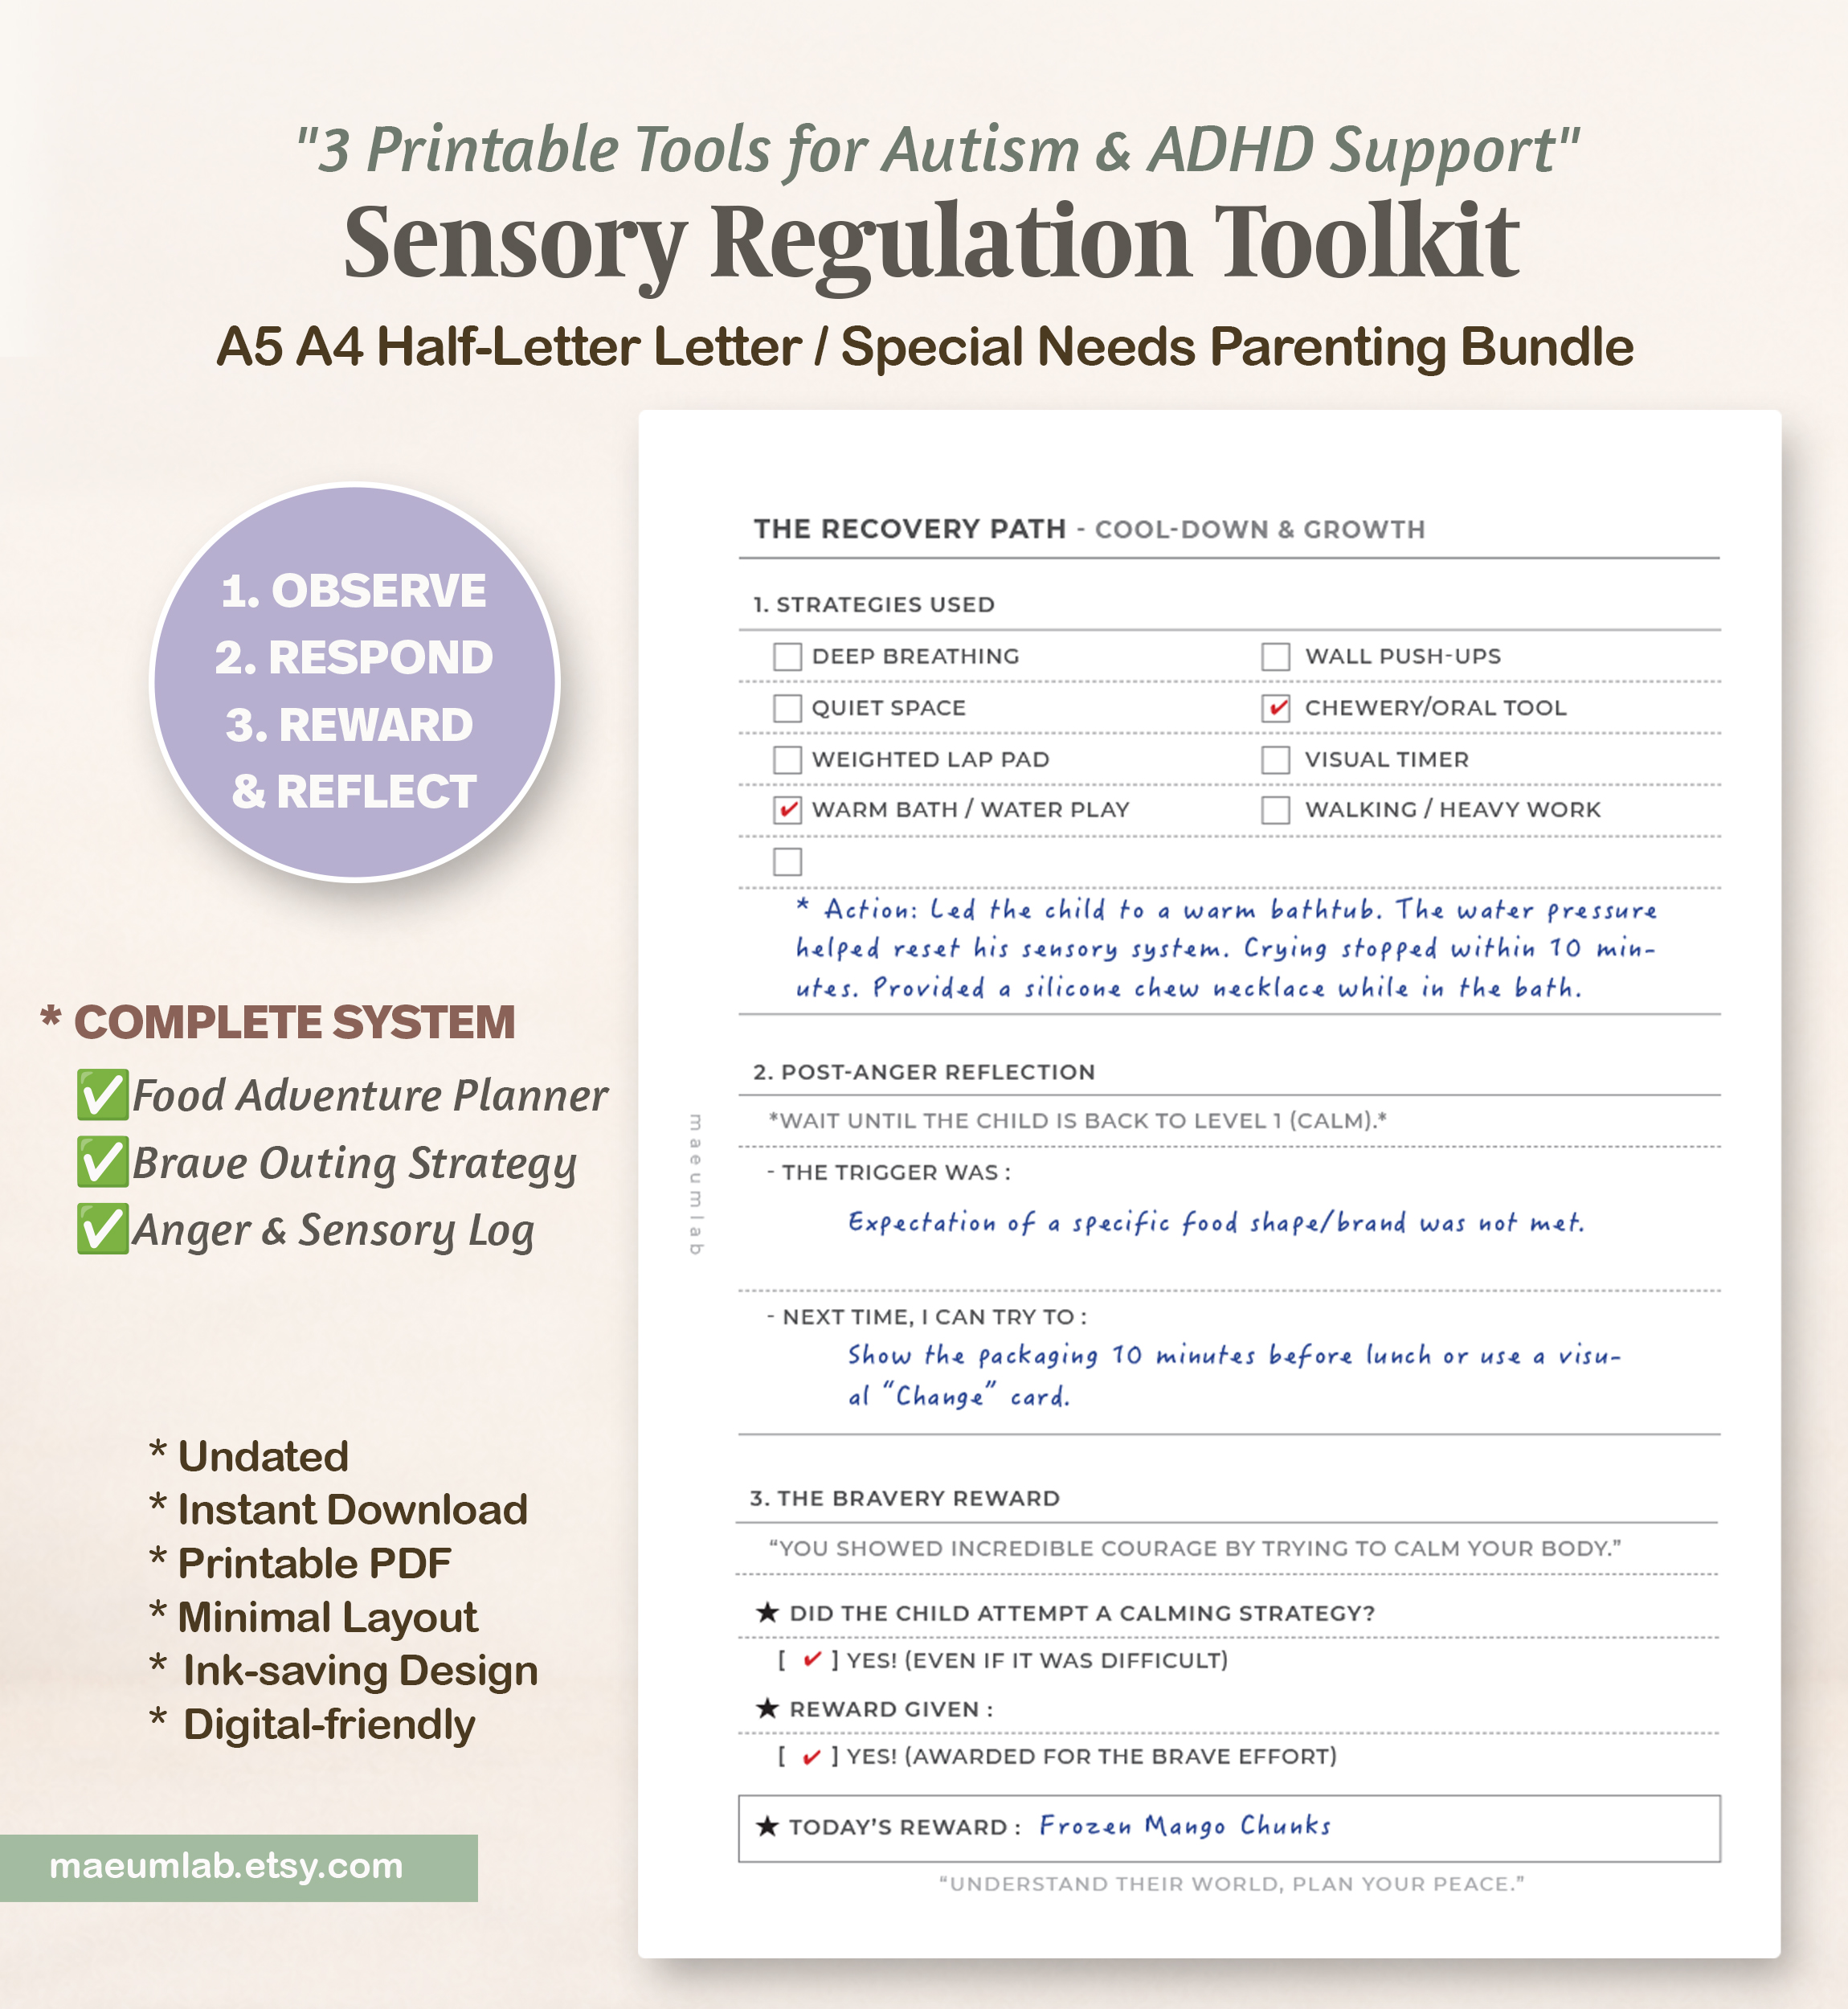
The Recovery Path helps you record what supported your child after an intense emotional or sensory experience.
Use this page after the child has had time to recover. The goal is not to analyze the event while they are still overwhelmed, but to notice which supports helped, what may have contributed, and what you might try next time.
1.RECORD THE STRATEGIES USED
Check the calming or regulation strategies that were offered or used.
These might include:
- Deep breathing
- Quiet space
- Weighted lap pad
- Warm bath or water play
- Wall push-ups
- Appropriate chew/oral sensory tool
- Visual timer
- Walking or heavy work
Use the notes area to record what actually seemed helpful.
Example:
Warm water helped reduce tension. Chewing also seemed calming while the child recovered.
Not every strategy will work every time. The purpose is to build a record of what tends to help in different situations.
2. REFLECT AFTER THE CHILD IS CALM
Wait until the child is back to a more settled state before reflecting on what happened.
Record:
THE TRIGGER MAY HAVE BEEN…
What seemed to contribute to the escalation?
NEXT TIME, I CAN TRY TO…
What could make a similar situation easier next time?
Example:
The expected food looked different than usual.
Next time, show the package ahead of time or prepare the child for the change visually.
Keep the reflection brief and practical.
3. RECOGNIZE THE RECOVERY EFFORT
If appropriate for your child, note whether they attempted a calming strategy or accepted support.
Recognition can focus on:
- Trying a regulation strategy
- Accepting support
- Communicating a need
- Returning to a calmer state
- Recovering after a difficult moment
The goal is not to reward the meltdown ending quickly.
The goal is to acknowledge effort, recovery, and self-regulation when those skills are available.
4. LOOK FOR WHAT WORKS OVER TIME
After several entries, review the Recovery Path pages and notice:
- Which strategies help most often?
- Which supports are rejected?
- Does the child recover faster in some environments?
- Are certain triggers repeating?
- What can be changed before the next similar situation?
These patterns can help you prepare support earlier and more confidently.
REMEMBER
Recovery is not a performance.
Some days the child may use a strategy independently. Other days they may need much more support.
Support first. Reflect later. Learn from what helped.
YOU’RE BUILDING A BETTER SUPPORT MAP
Observe • Support • Adjust • Grow
Sensory needs aren’t always predictable.
What works one day may not work the same way another day — and that’s okay.
The Sensory Regulation Toolkit isn’t about finding one perfect strategy. It’s about noticing patterns over time and building a clearer understanding of what helps your child feel safer, more comfortable, and better supported.
KEEP WHAT WORKS
As you use the toolkit, look back at your pages occasionally.
Notice:
- Sensory preferences that appear repeatedly
- Early signs of overwhelm
- Environments or situations that are more challenging
- Strategies that consistently help
- Supports that don’t seem helpful
- Small changes that make experiences easier
Each observation gives you another piece of your child’s individual support map.
USE THE TOOLS FLEXIBLY
You don’t need to complete every page or follow a specific order.
Food feels challenging?
Use the Food Adventure pages.
Preparing for an outing?
Use the Sensory Profile Map + Brave Outing Strategy.
Trying to understand an intense reaction?
Use the Anger Map + Recovery Path.
Print a fresh copy whenever you need one and return to the tools that are most useful for your child.
PROGRESS CAN LOOK DIFFERENT
Progress may be trying something new.
It may be communicating discomfort earlier.
It may be discovering a trigger.
It may be finding a calming strategy that helps.
And sometimes, progress is simply understanding your child’s needs a little better than you did before.
OBSERVE THE PATTERN.
RESPECT THE NEED.
BUILD SUPPORT THAT FITS THE CHILD.
Thank you for choosing maeumlab.
Tools for understanding, supporting, and growing — one small step at a time.
MaeumLab
Practical planning tools designed for neurodivergent minds.
Explore more printable support systems, planning tools, and resources at MaeumLab Resource Library.