
How to Use the Neural Blueprint: 8-in-1 Systems
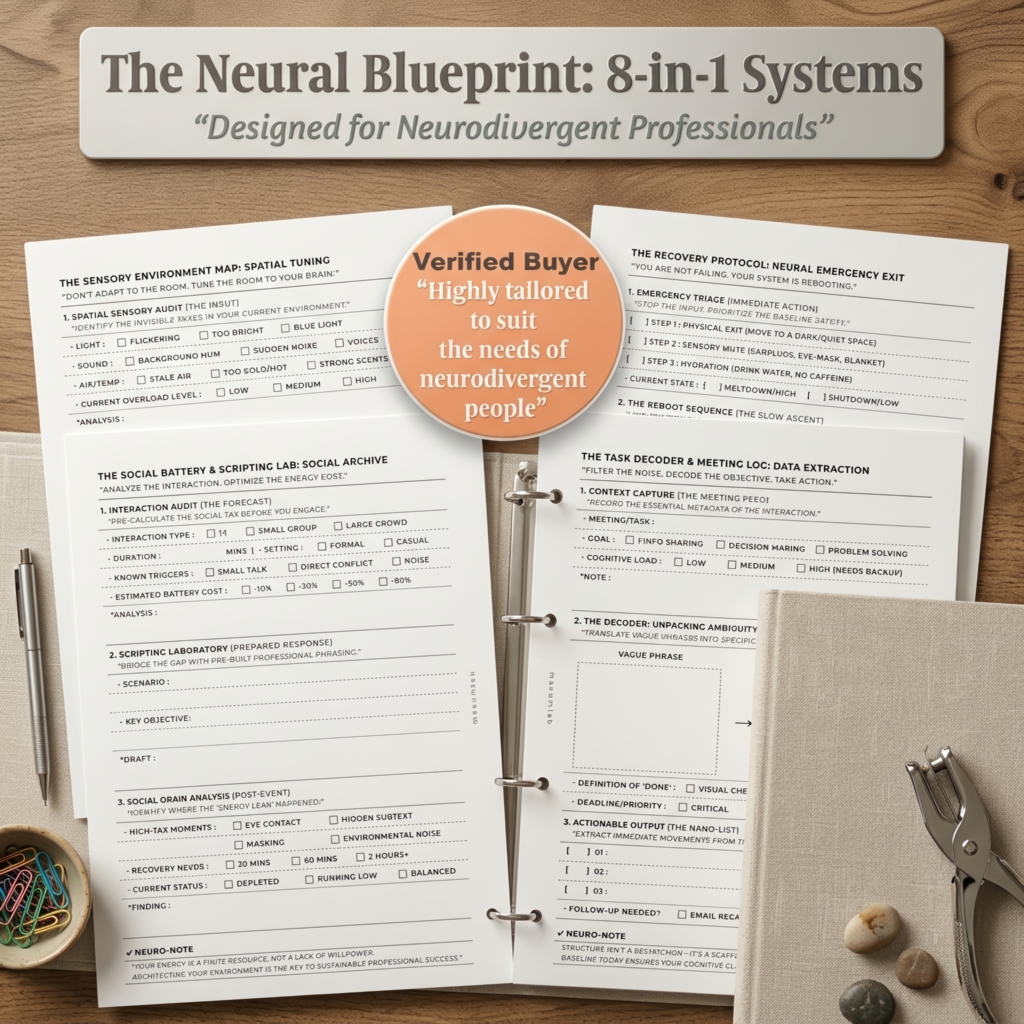
A Practical Support System for Neurodivergent Professionals
A Practical Support System for Neurodivergent Professionals
The Neural Blueprint is a collection of eight structured tools designed to help neurodivergent professionals better understand and support the way they work.
Instead of pushing through sensory overload, fluctuating energy, executive function challenges, or social demands, this system helps you identify what your brain and nervous system need — and make practical adjustments before overwhelm builds.
The eight tools work together to support energy management, sensory regulation, communication, task clarity, recovery, and sustainable professional routines.
You don’t need to use every page every day. Choose the tool that matches what you’re experiencing, and over time, use the system to recognize patterns and build a work environment that supports you.
Inside the 8-in-1 System
01. Energy Architecture
Assess your available energy and plan demands around your actual capacity.
02. Professional Advocacy
Turn sensory and cognitive needs into clear, practical workplace requests.
03. Regulation Reflection
Notice masking, sensory residue, and what your nervous system needs to recover.
04. Executive Function “Unstuck” Map
Identify what’s blocking a task and break it into a smaller starting point.
05. Social Battery & Scripting Lab
Prepare for demanding interactions, create scripts, and track their energy cost.
06. Task Decoder & Meeting Log
Turn vague instructions, meetings, and expectations into concrete next actions.
07. Sensory Environment Map
Identify environmental friction and build a workspace that better supports focus.
1.Autistic Energy Architecture: System Calibration
Start by understanding how much capacity you actually have today.
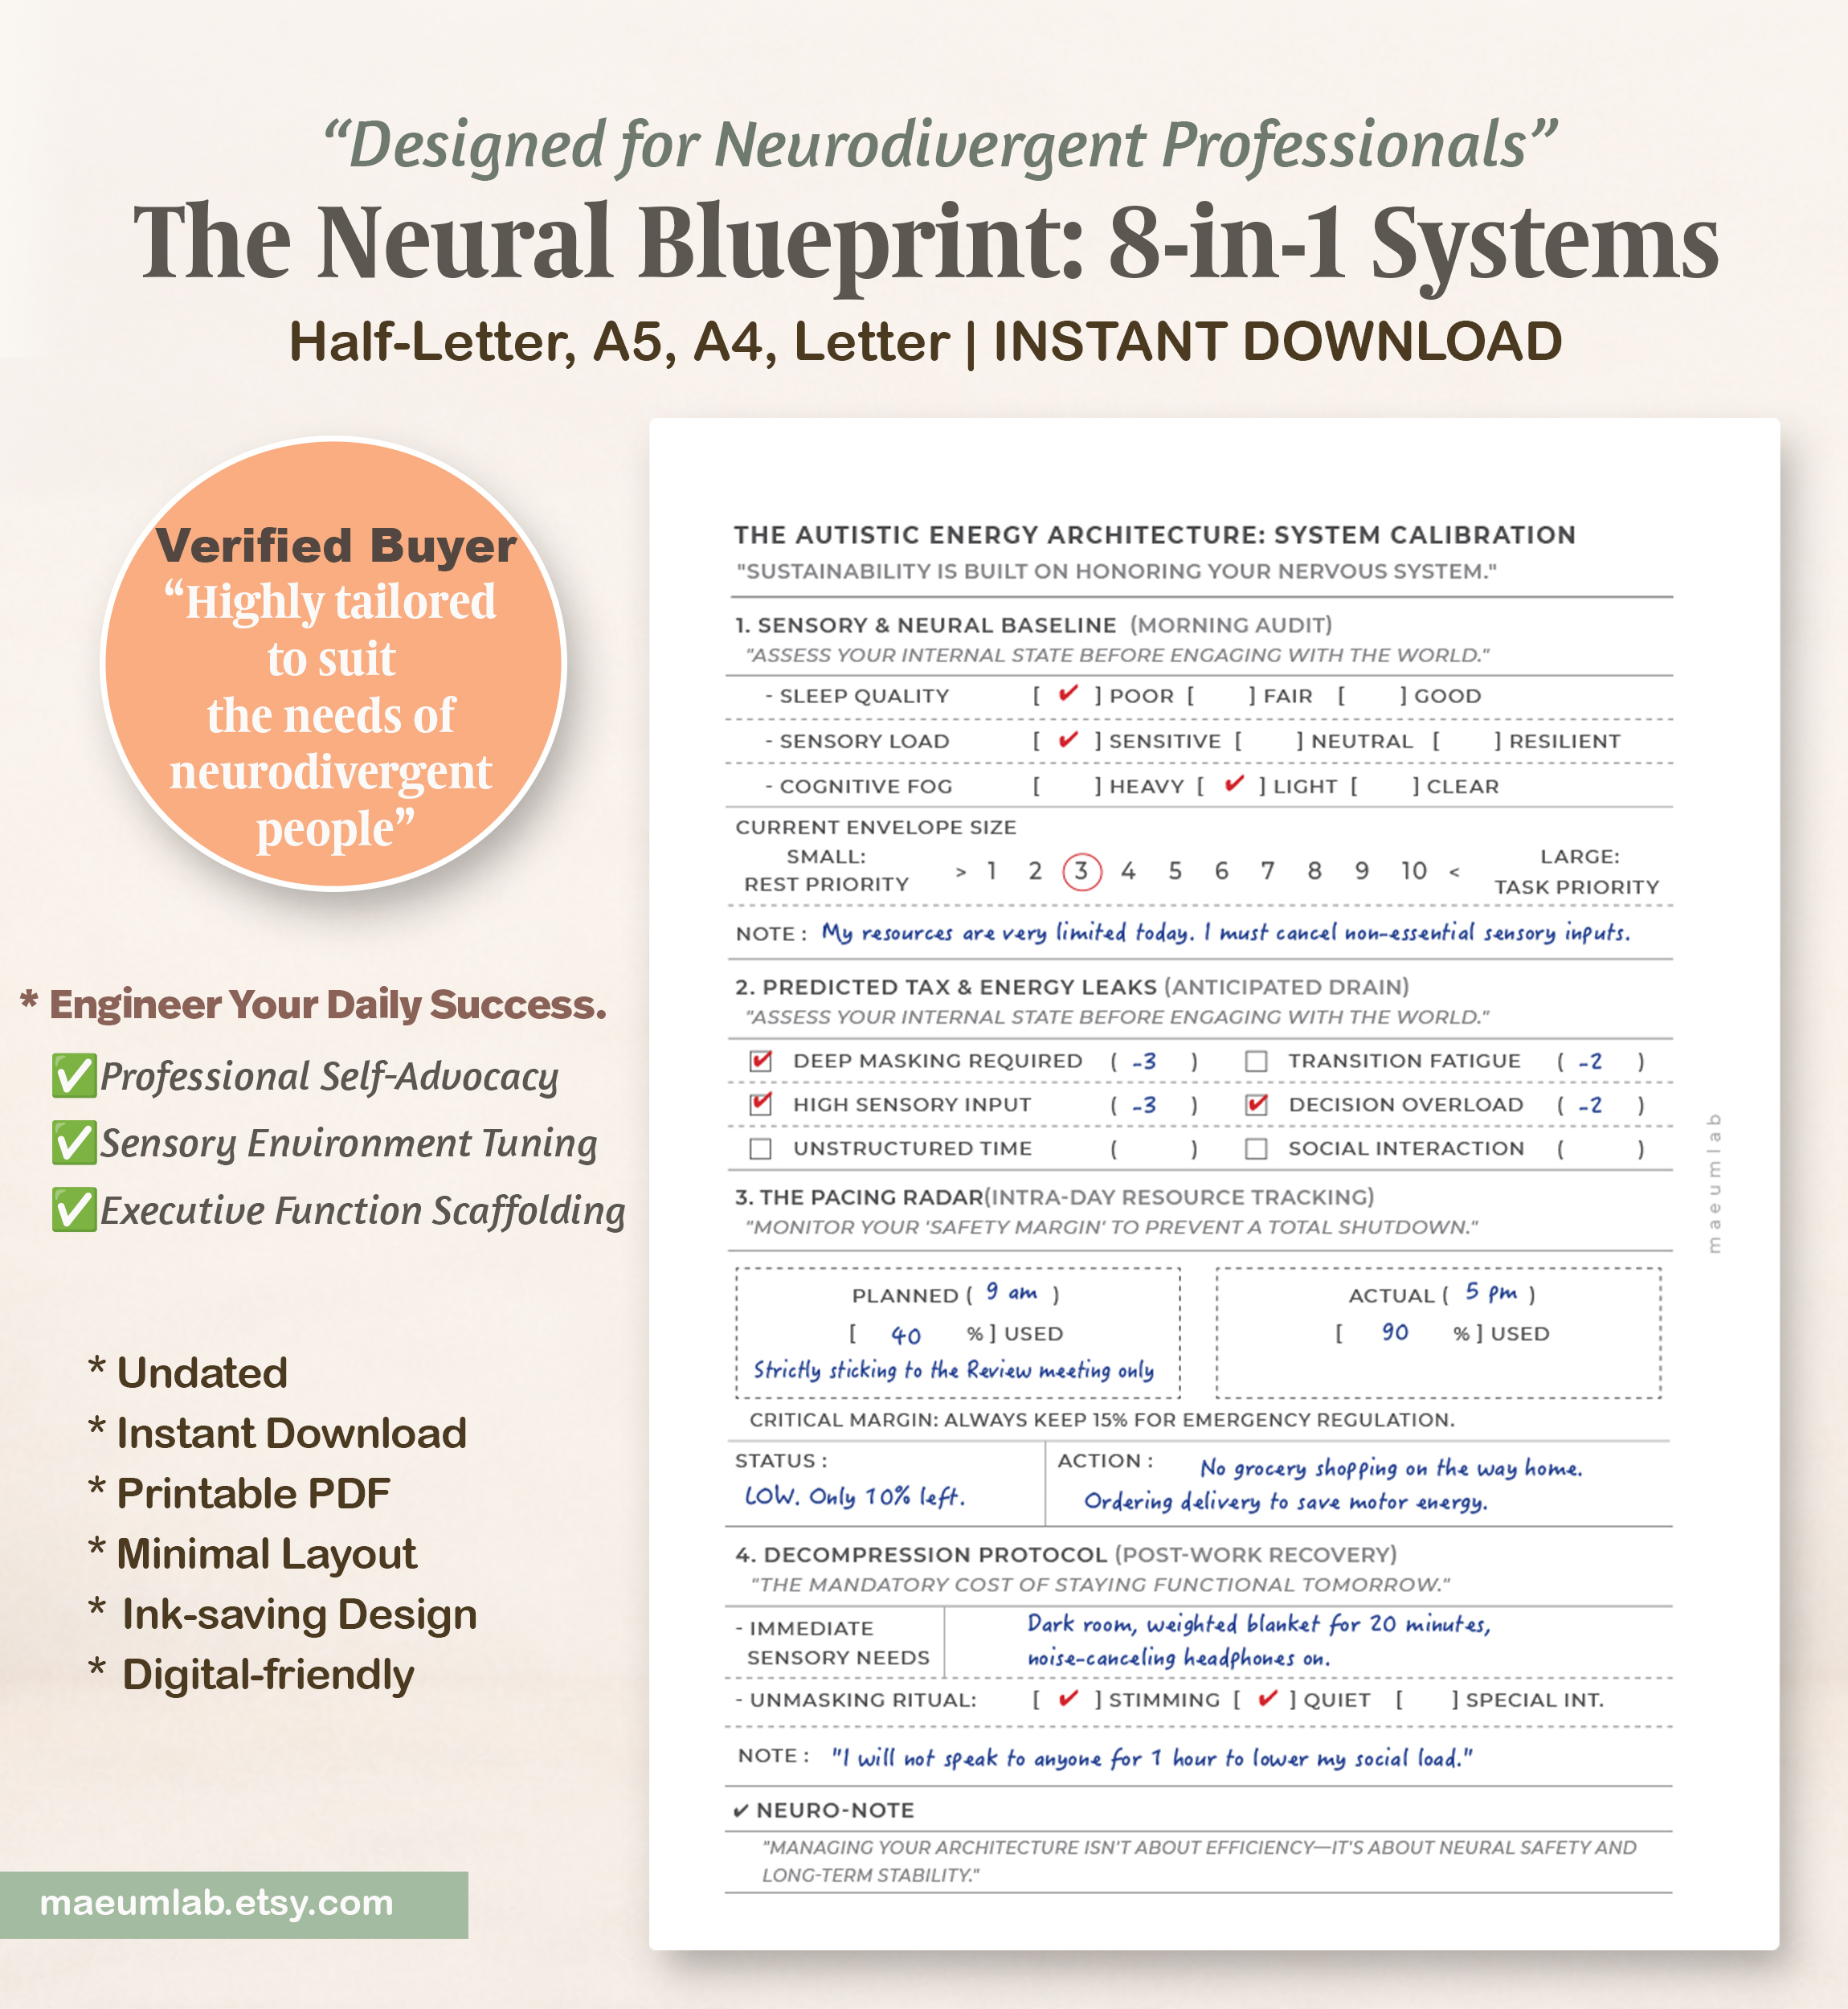
The Energy Architecture page is designed to help you check your available capacity before deciding what your day should look like.
Start with the Sensory & Neural Baseline to notice sleep quality, sensory load, cognitive fog, and your current “energy envelope.” This gives you a more realistic picture of how much demand your system can comfortably handle.
Next, use Predicted Tax & Energy Leaks to identify activities that may require extra energy — such as masking, sensory input, transitions, decision-making, or social interaction.
During the day, the Pacing Radar helps you compare the energy you expected to use with what you actually used. If your available margin is getting low, use that information to reduce demands rather than automatically pushing through.
Finally, complete the Decompression Protocol to plan what your nervous system may need after work.
When to Use It:
- At the beginning of a demanding workday
- Before meetings, social demands, or high-focus tasks
- When you notice your capacity changing throughout the day
Think of this page as your daily system calibration — check your capacity first, then build the day around it.
2.Professional Advocacy Library
Turn workplace barriers into clear, practical requests.
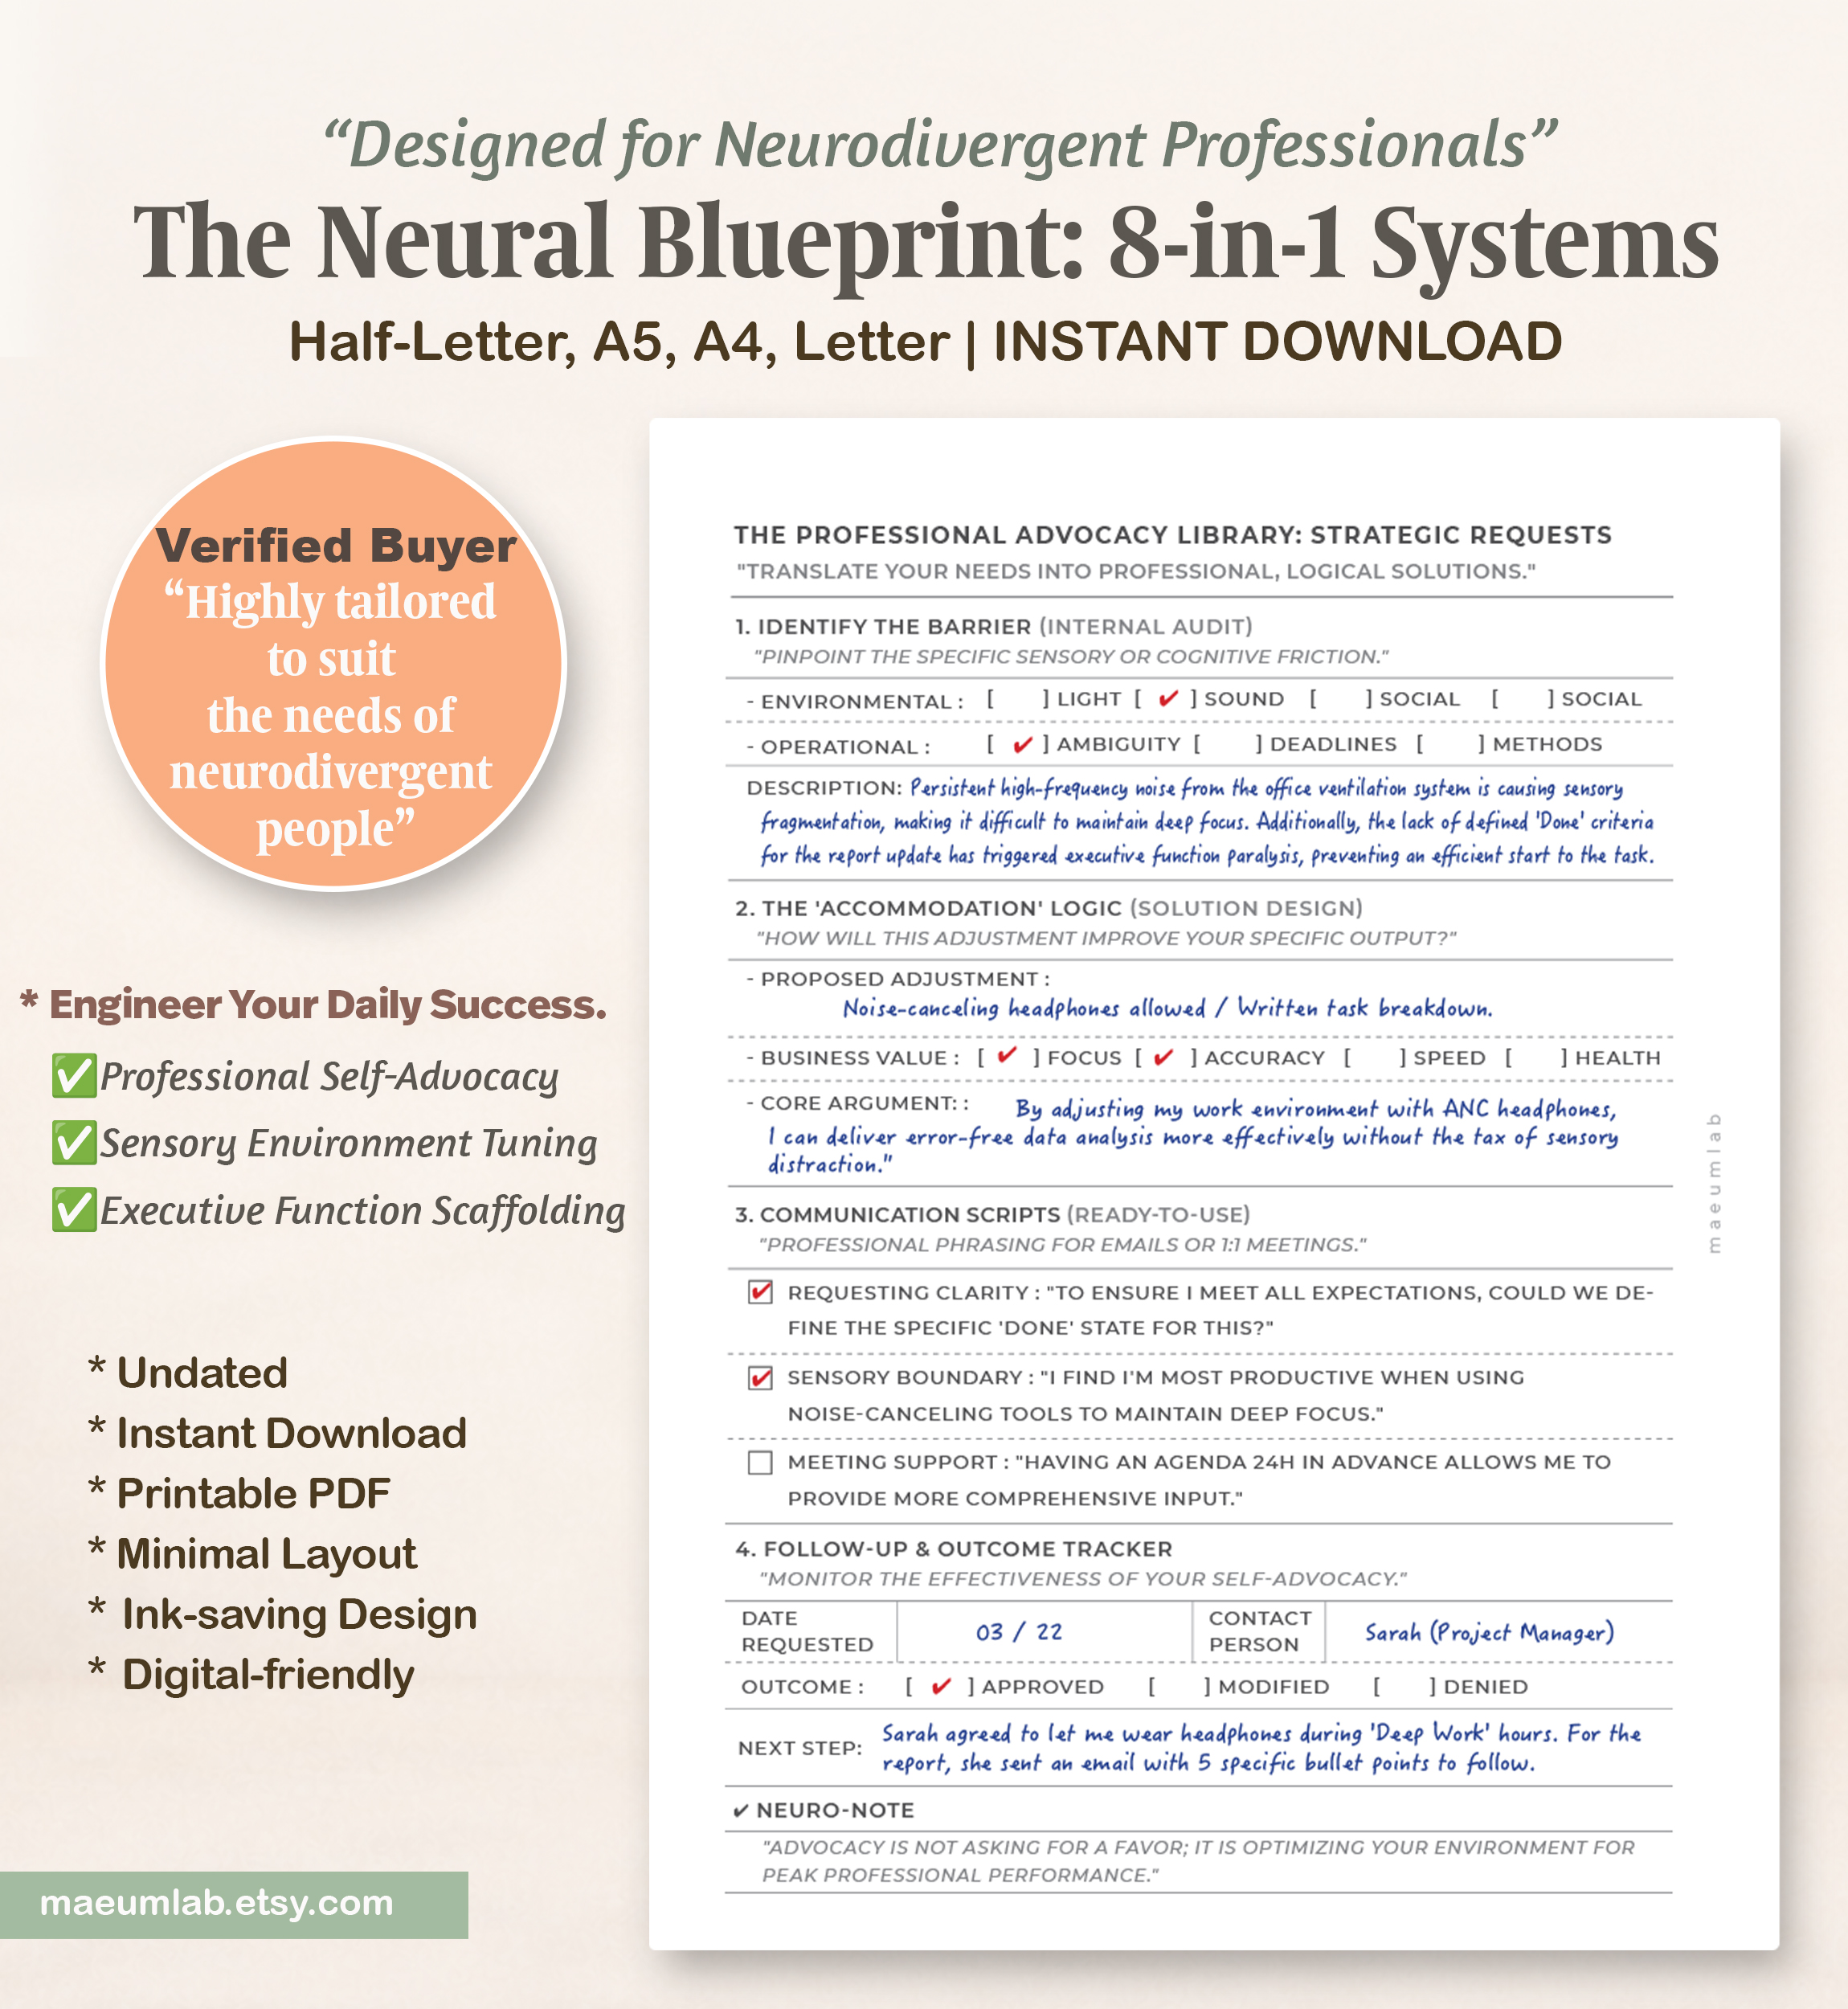
The Professional Advocacy Library helps you identify what is making work harder and translate that challenge into a specific, professional request.
Start with Identify the Barrier. Check whether the difficulty is related to your environment, sensory input, social demands, unclear expectations, deadlines, or work methods. Then briefly describe what is happening and how it affects your ability to work.
Next, use Accommodation Logic to move from the problem to a possible adjustment. Rather than simply writing what feels difficult, consider what change could help you work more effectively — and how that change may support focus, accuracy, speed, or overall functioning.
The Communication Scripts section gives you starting language for situations such as asking for clearer instructions, explaining a sensory boundary, or requesting additional meeting structure.
Finally, use the Follow-Up & Outcome Tracker to record what you requested, the response you received, and what you may need to do next.
When to Use It
- When workplace expectations feel vague or difficult to interpret
- When sensory or environmental factors interfere with your work
- Before asking for clarification, adjustments, or additional structure
Think of this page as a bridge between “This isn’t working for me” and “Here is a practical change that could help.”
3.Neuro-Regulation Reflection
Notice the hidden cost of getting through the day — and give yourself space to recover.
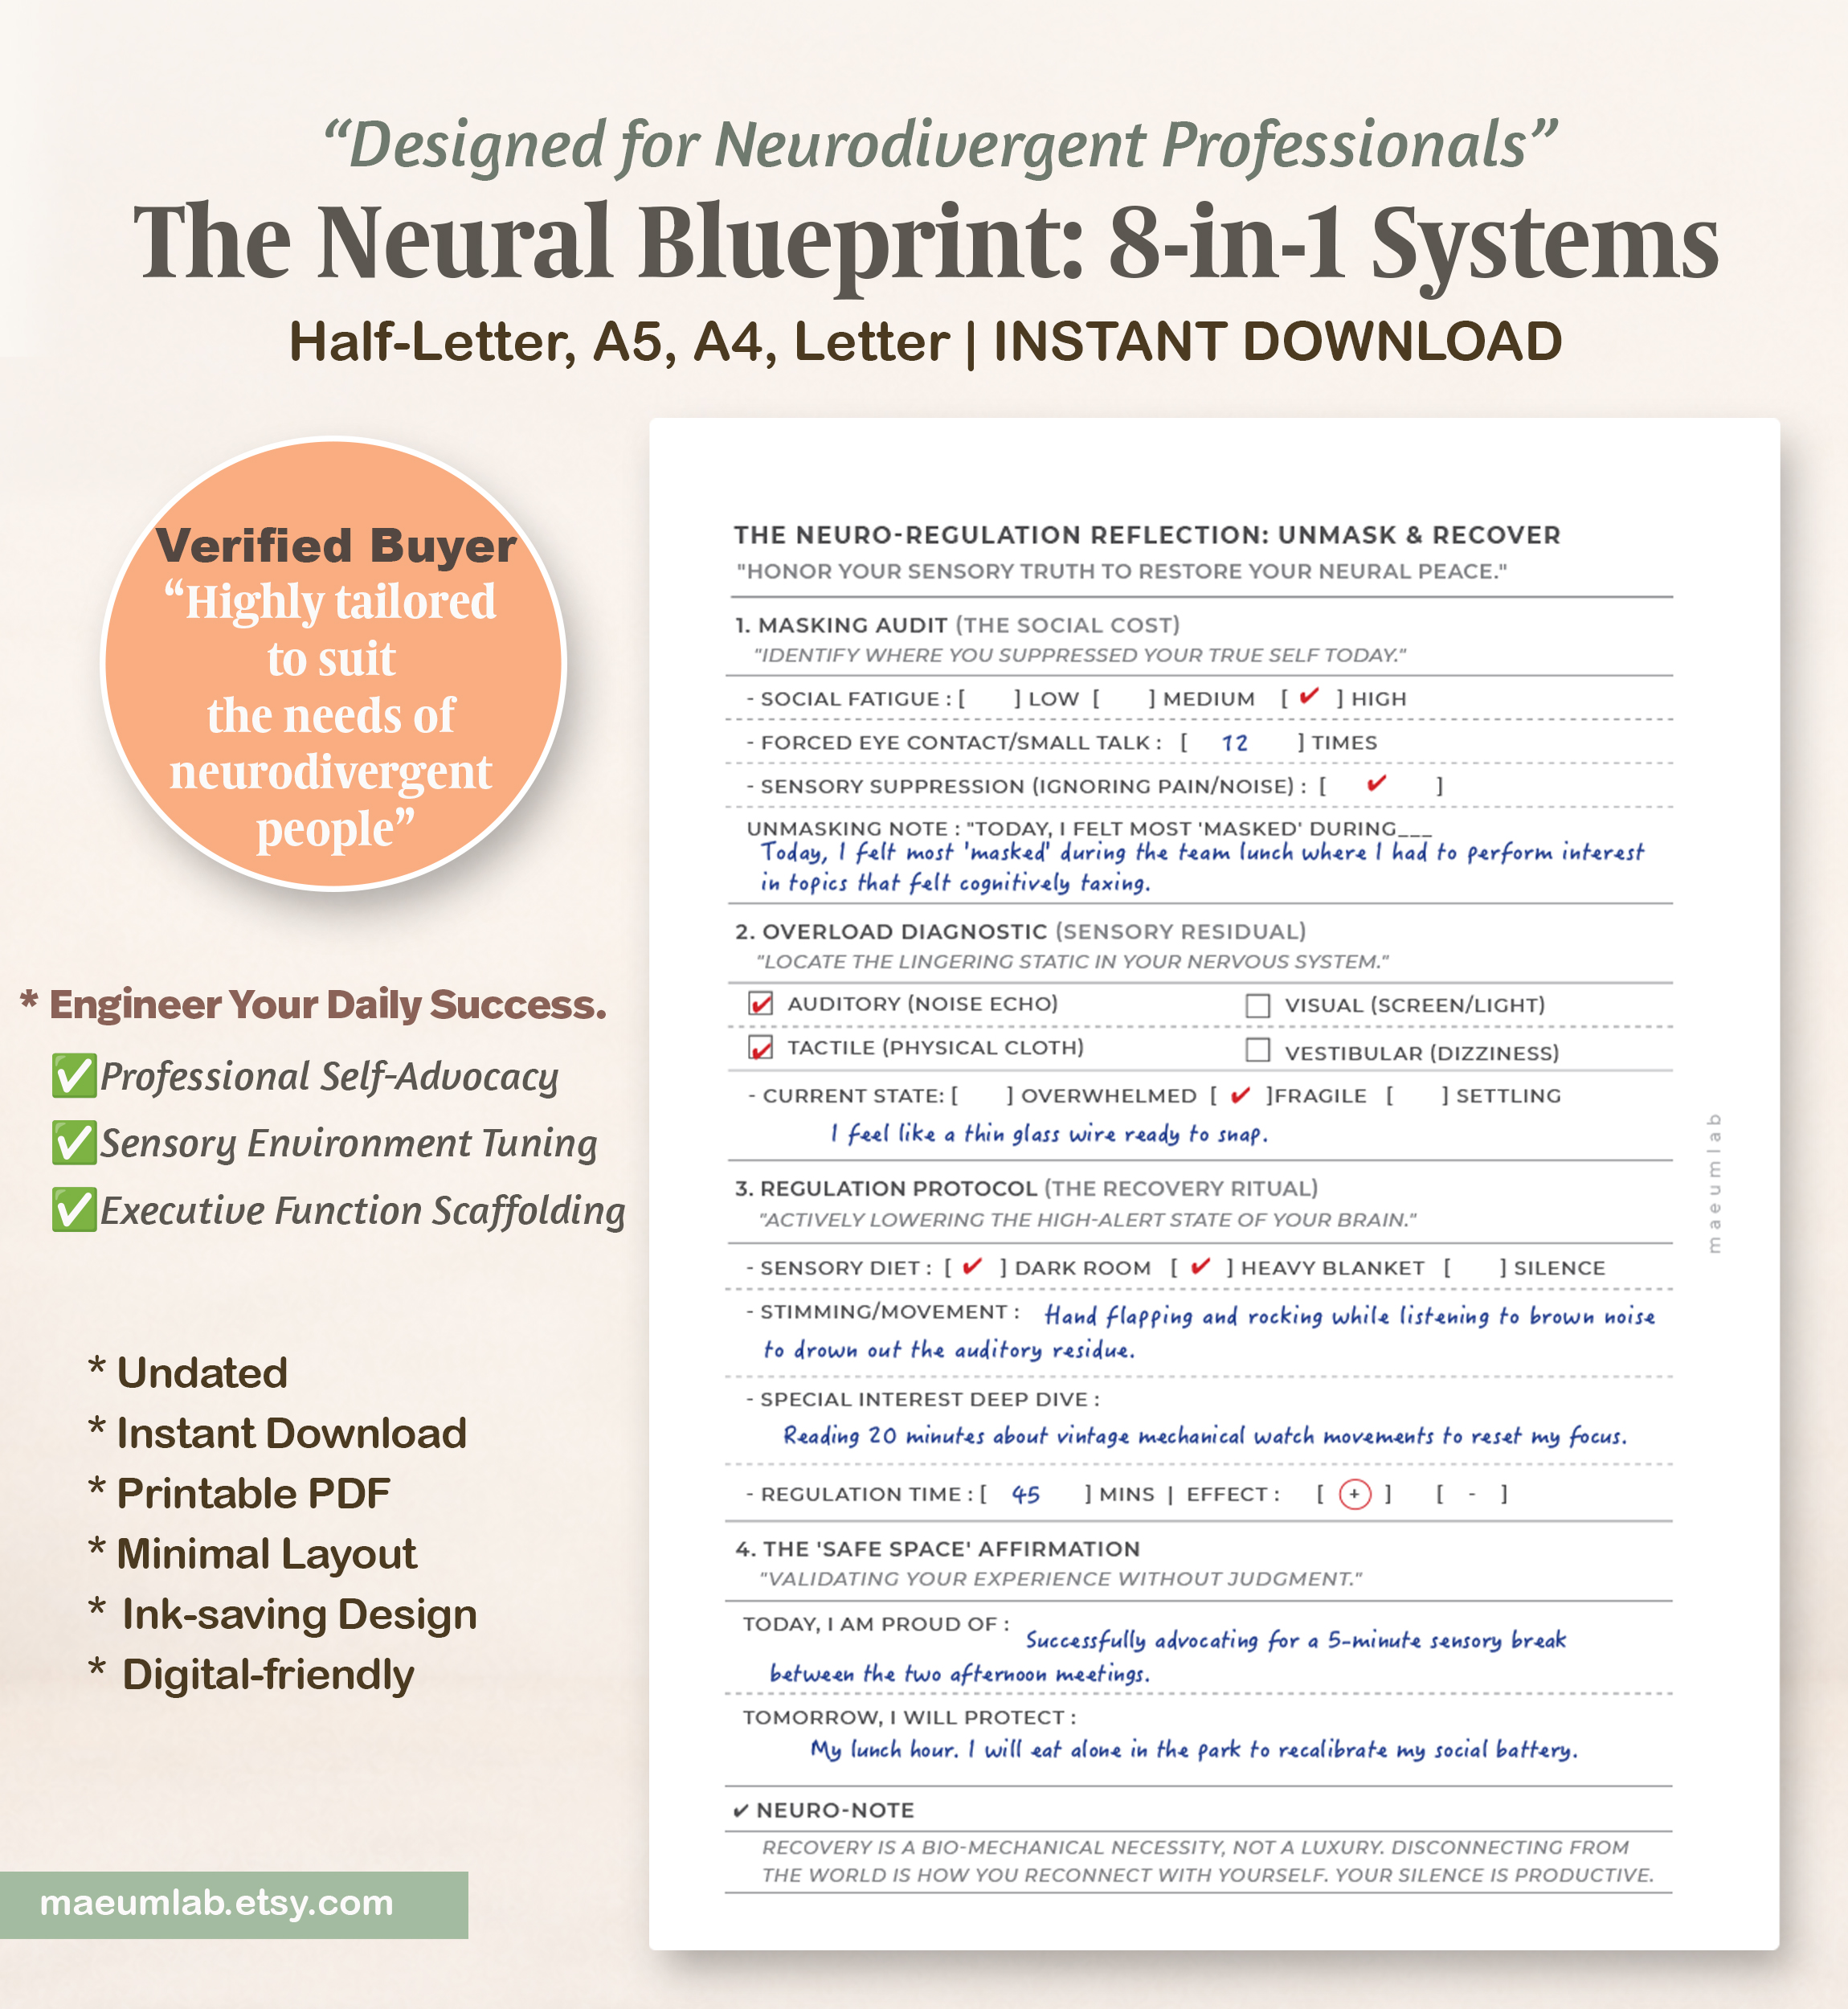
The Neuro-Regulation Reflection helps you look beyond whether you simply “got through” the day and notice what it may have cost your nervous system.
Begin with the Masking Audit to reflect on social fatigue, forced interactions, or moments when you ignored sensory discomfort in order to keep functioning.
Next, use the Overload Diagnostic to identify what may still be lingering after the experience — such as sound, light, physical sensations, or a general feeling of being overwhelmed or fragile.
The Regulation Protocol then helps you choose supportive ways to decompress. This might include reducing sensory input, movement, quiet time, or spending time with a familiar interest.
Finally, use the Safe Space Reflection to acknowledge what went well and decide what you want to protect or do differently tomorrow.
When to Use It
- After a socially or sensory-demanding day
- When you feel drained but aren’t sure why
- When you need to understand what kind of recovery may help
This page isn’t about judging how well you handled the day. It’s about noticing what the day asked from you — so you can respond to your needs more intentionally.
4.Executive Function ‘Unstuck’ Map
When a task feels impossible to start, make the starting point smaller.
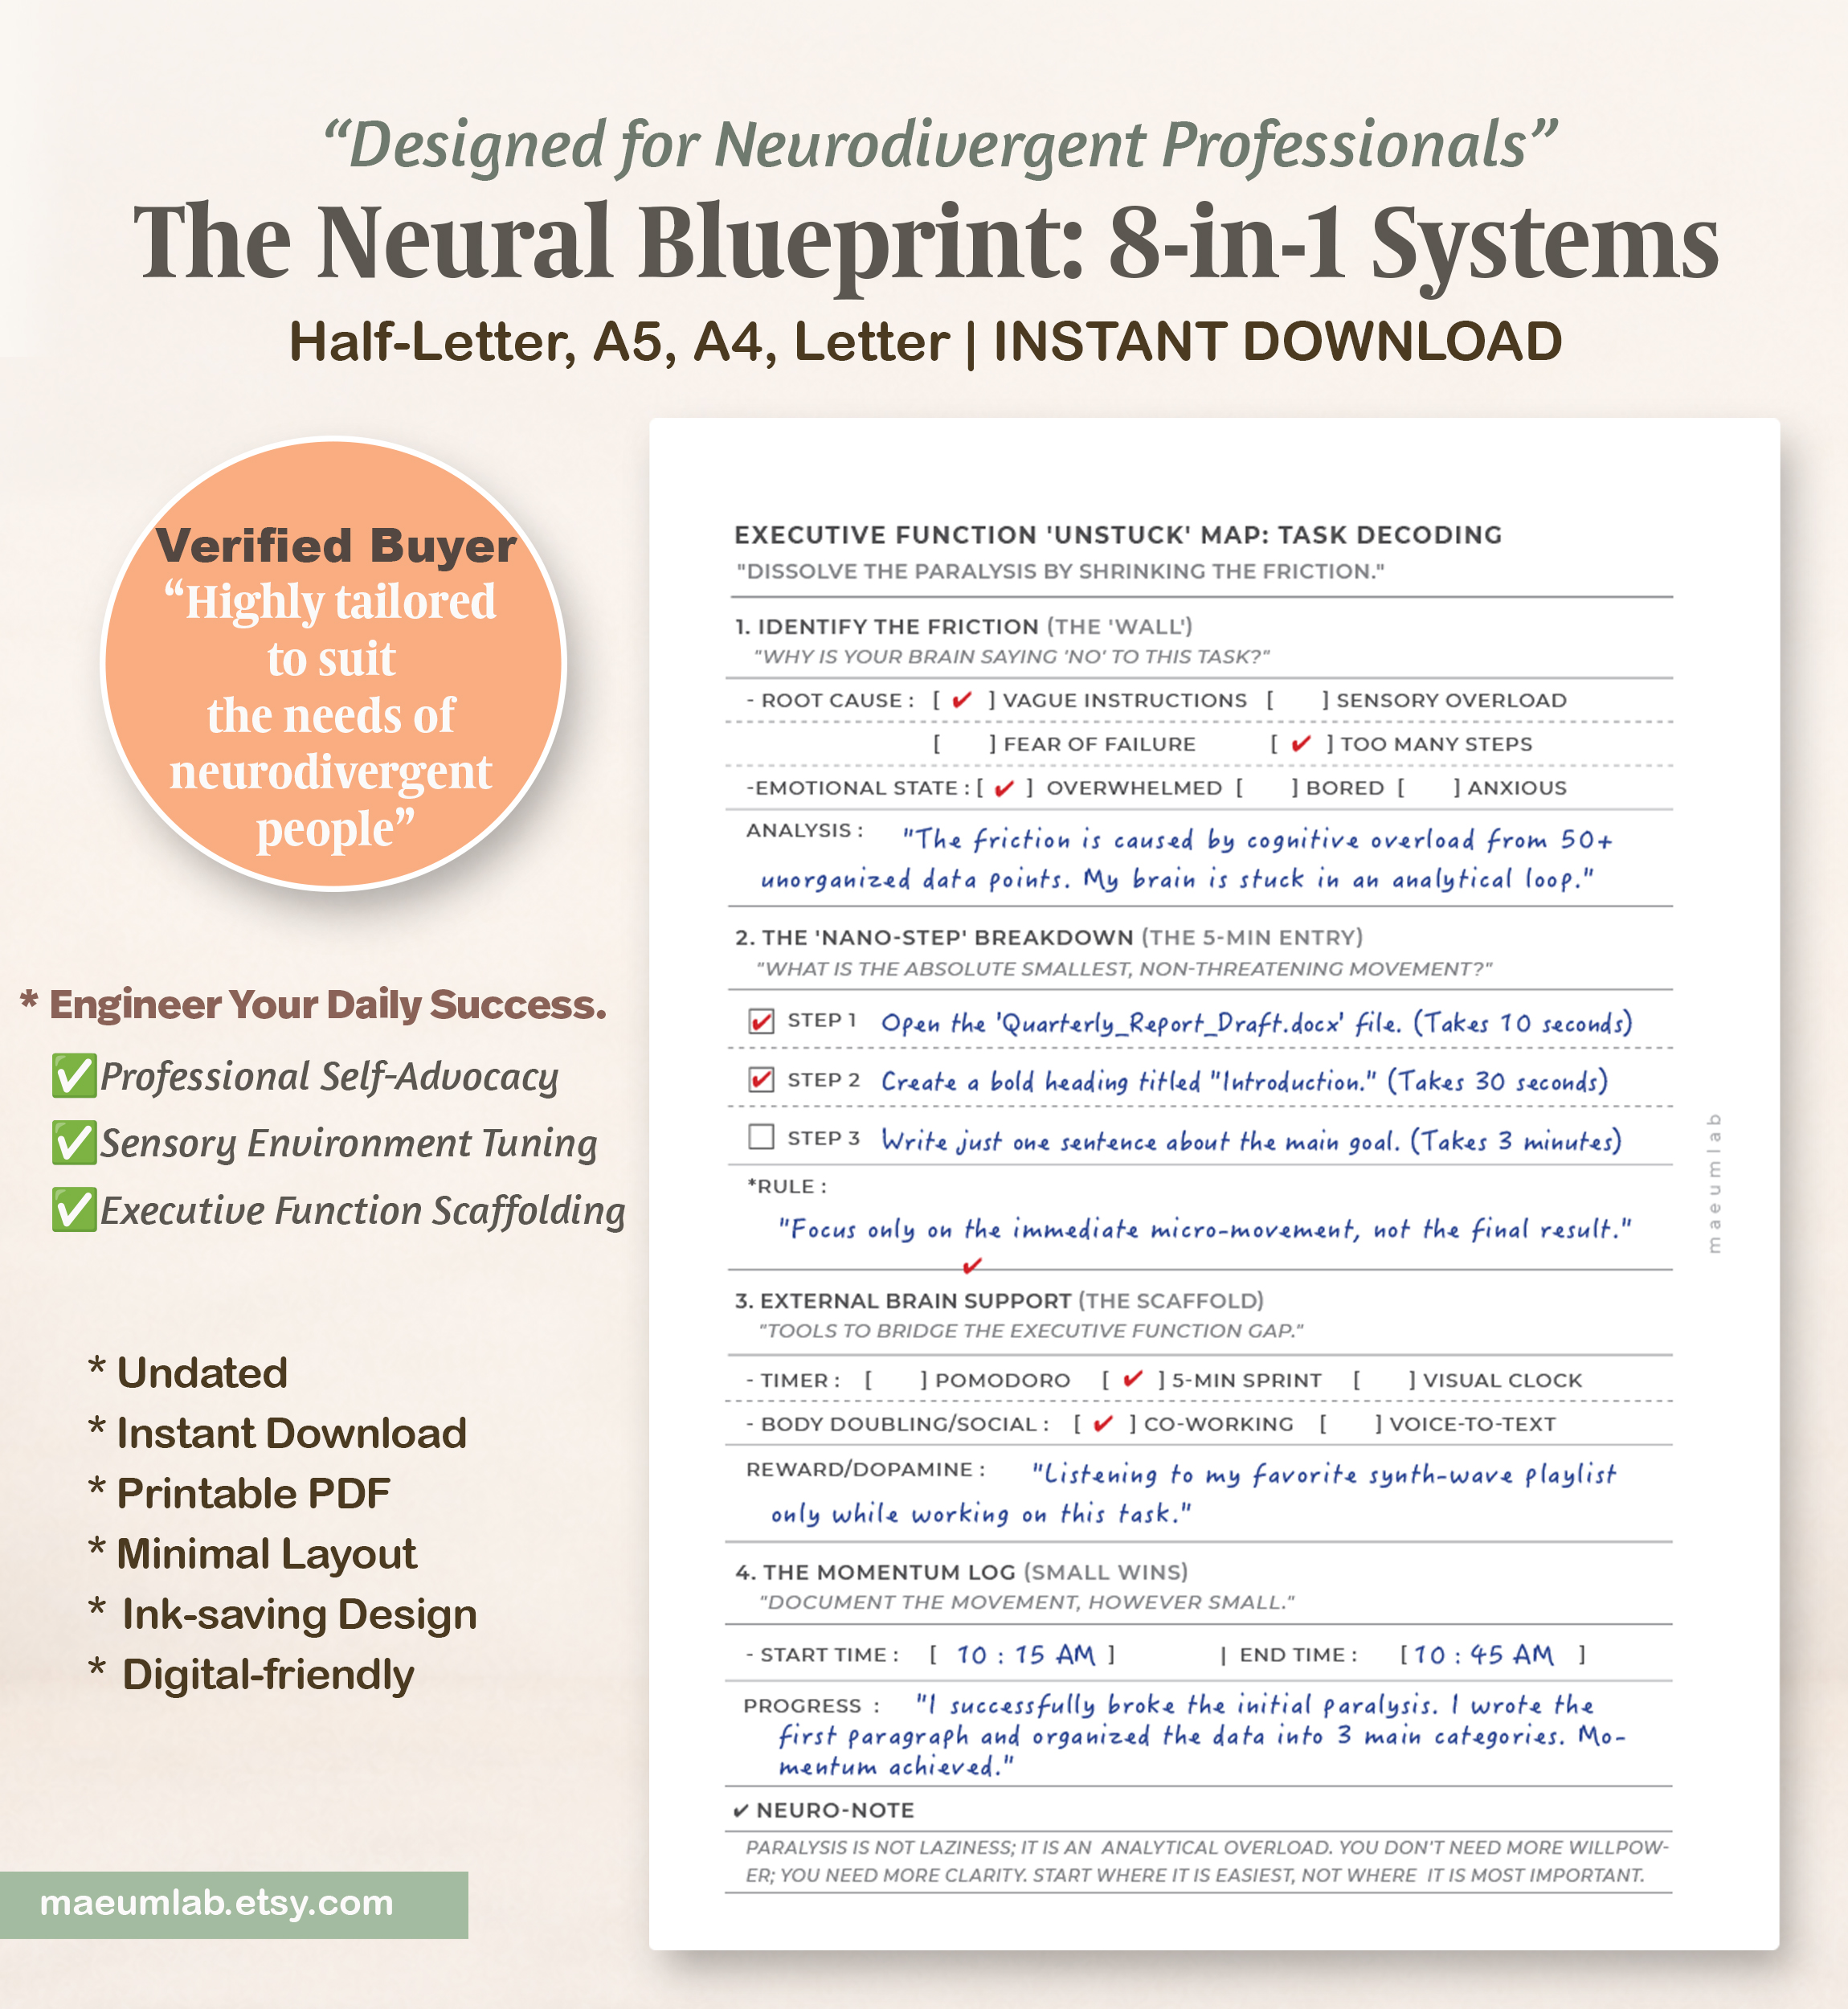
The Executive Function ‘Unstuck’ Map is designed for moments when you know what you need to do — but your brain still won’t start.
Begin with Identify the Friction. Instead of labeling the problem as procrastination, look for what is actually creating resistance: vague instructions, too many steps, sensory overload, fear of failure, boredom, or overwhelm.
Next, use the Nano-Step Breakdown to shrink the task into the smallest possible starting actions. The goal isn’t to finish the whole project. It’s simply to make the first movement feel manageable.
The External Brain Support section helps you choose additional structure — such as a timer, a short work sprint, body doubling, co-working, or a motivating reward.
Finally, record your progress in the Momentum Log. Even a small amount of movement counts because the purpose of this page is to help you move from stuck to started.
When to Use It
- When you keep avoiding a task you genuinely want or need to complete
- When a project feels too large or unclear to begin
- When you’re staring at your task list but can’t decide what to do first
Don’t ask, “How do I finish this?” Start with, “What is the smallest action I can do next?”
Once your system feels more regulated, the next step is reducing the friction between knowing what needs to be done and actually getting started.
5.Social Battery & Scripting Lab
Plan for the energy cost of social interaction — before it drains your battery.
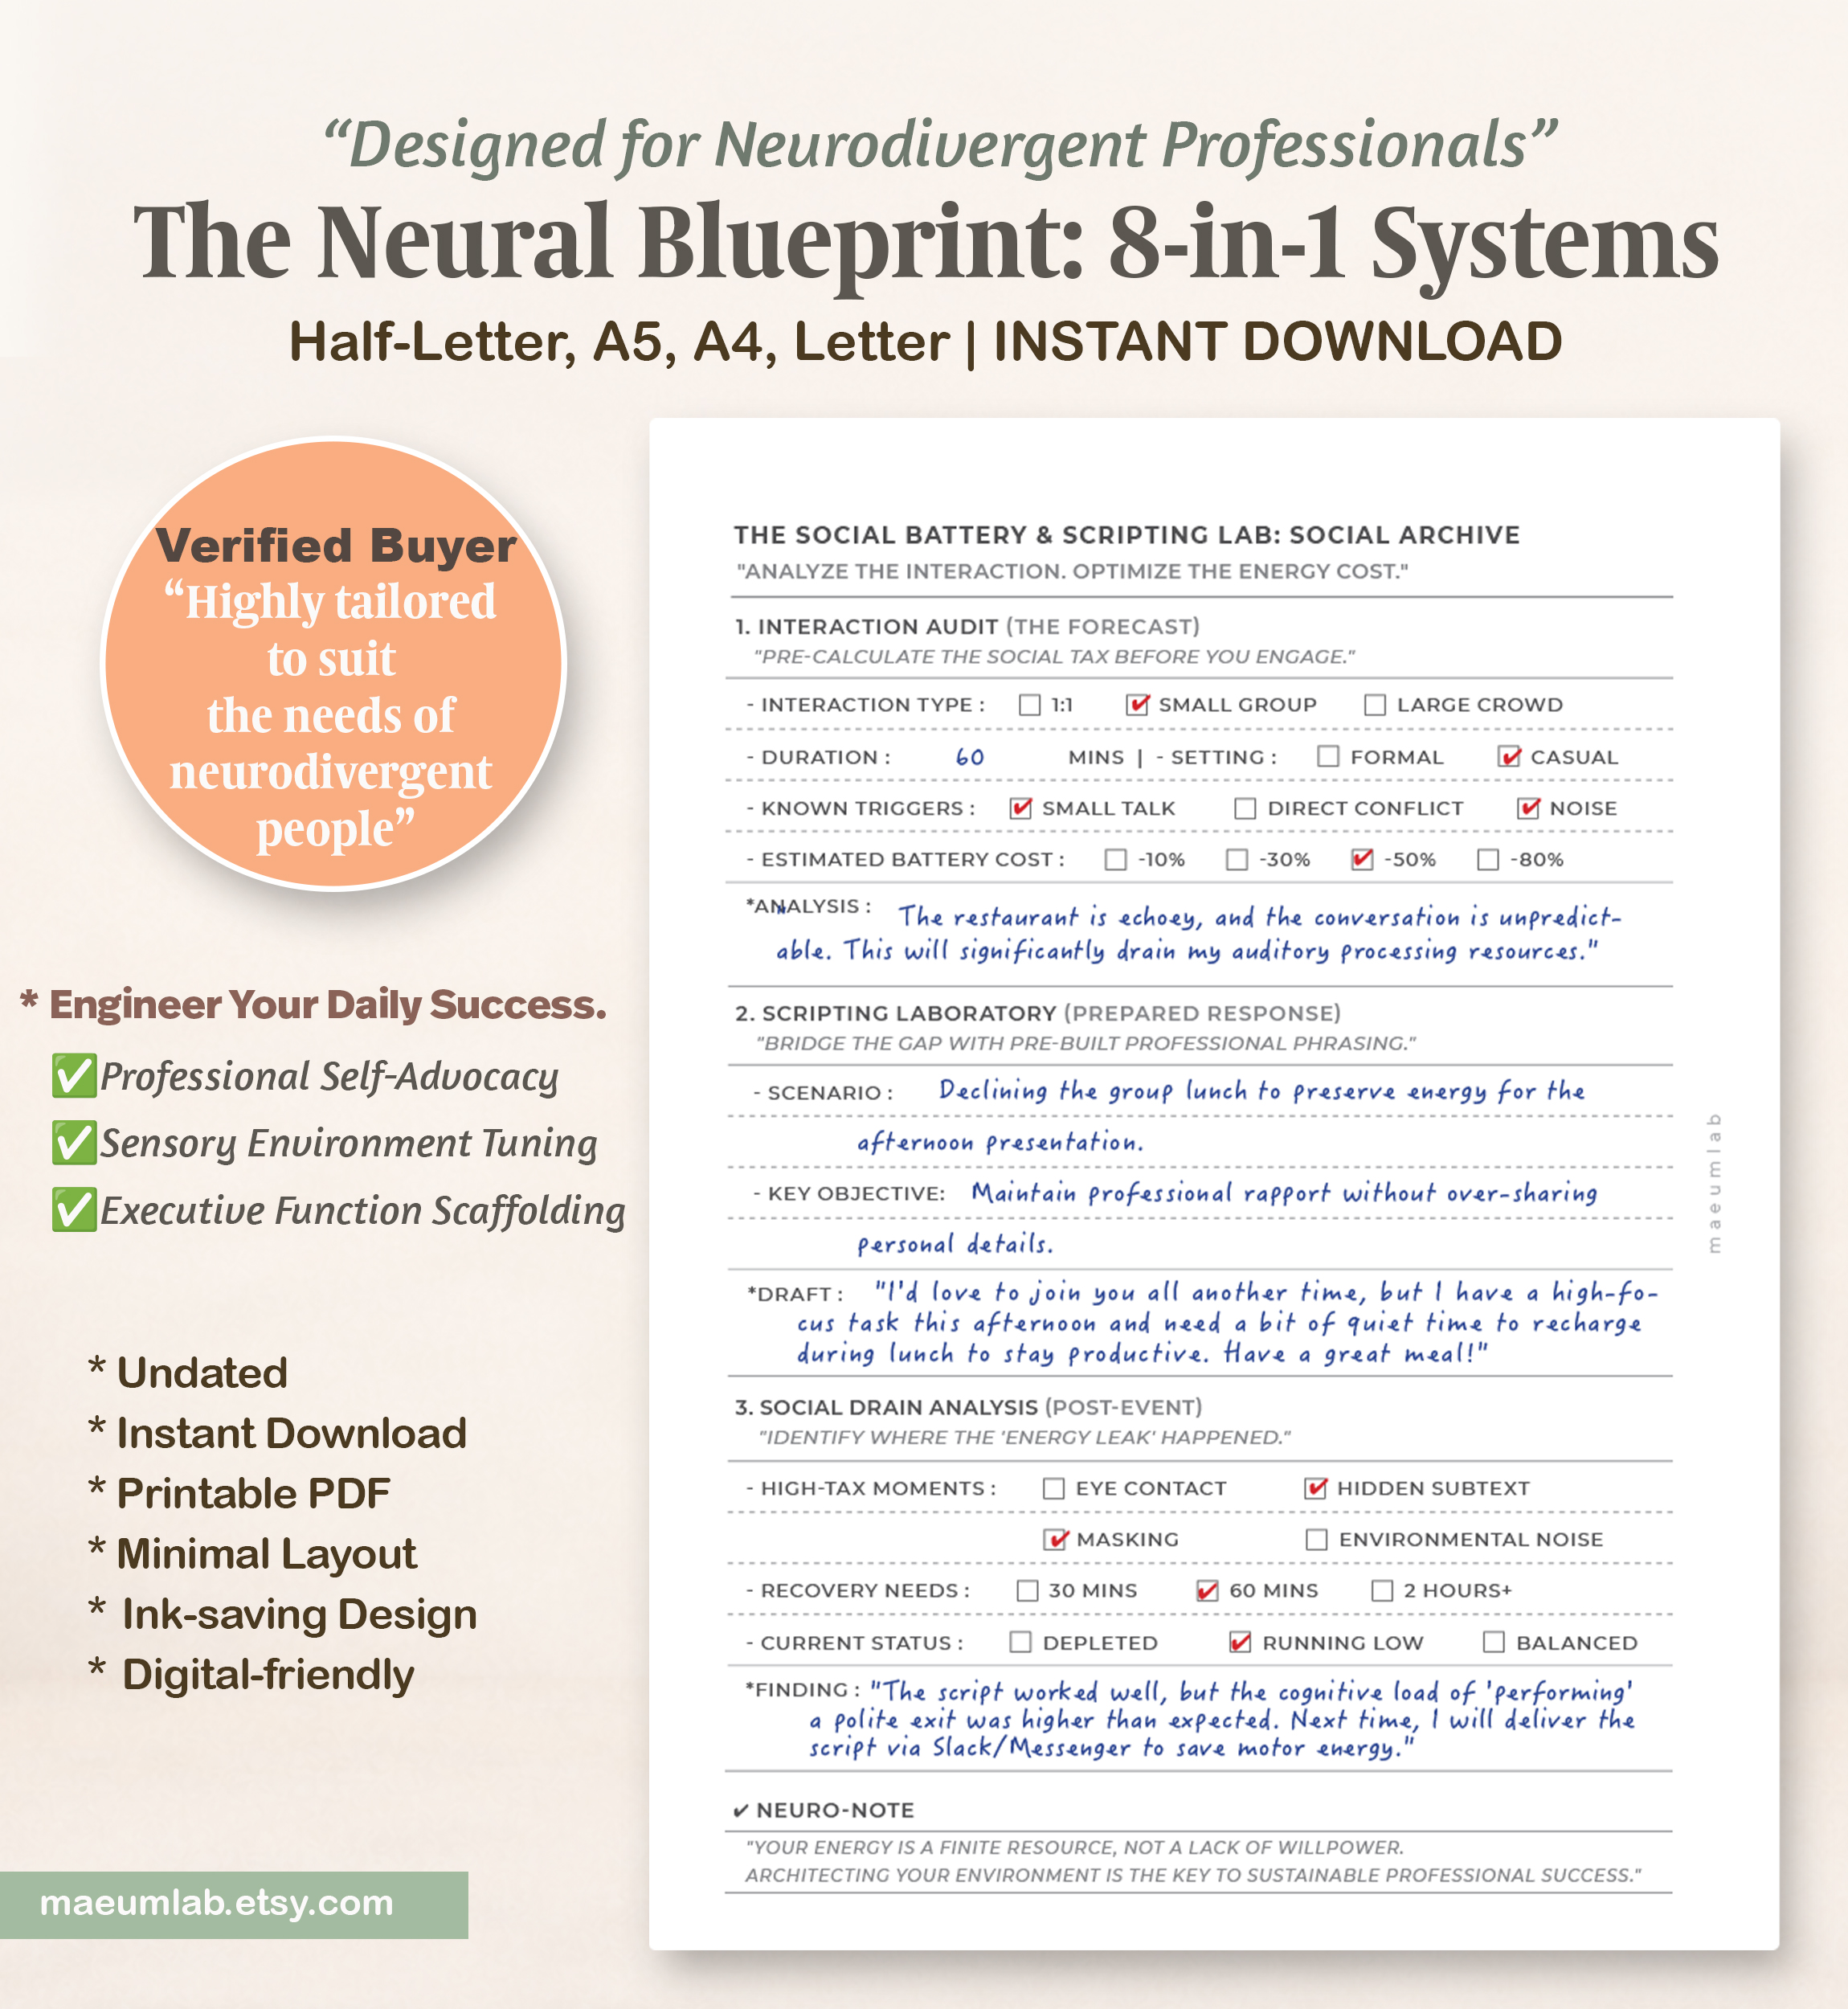
The Social Battery & Scripting Lab helps you prepare for social demands, communicate with more clarity, and understand how different interactions affect your energy.
Start with the Interaction Audit before a meeting, lunch, networking event, or other social situation. Consider the type of interaction, how long it may last, possible triggers, and how much energy you expect it to require.
Next, use the Scripting Laboratory to prepare language for situations that may otherwise require a lot of on-the-spot processing. Write down the situation, what you want to communicate, and a simple response you can use when needed.
After the interaction, complete the Social Drain Analysis. Notice which parts required the most energy — such as masking, reading hidden social cues, eye contact, noise, or other environmental demands — and estimate how much recovery time you may need.
Over time, this can help you recognize which social situations require more preparation, stronger boundaries, or additional recovery time.
When to Use It
- Before meetings, work lunches, networking, or group events
- When you want to prepare what to say ahead of time
- After an interaction that left you more drained than expected
The goal isn’t to avoid social interaction — it’s to understand its energy cost and plan for it more intentionally.
Professional Advocacy: “What do I need to ask for?”
Social Battery Lab: “What will this interaction cost me, and how can I prepare?”
6.Task Decoder & Meeting Log
Turn vague conversations and instructions into clear, actionable next steps.
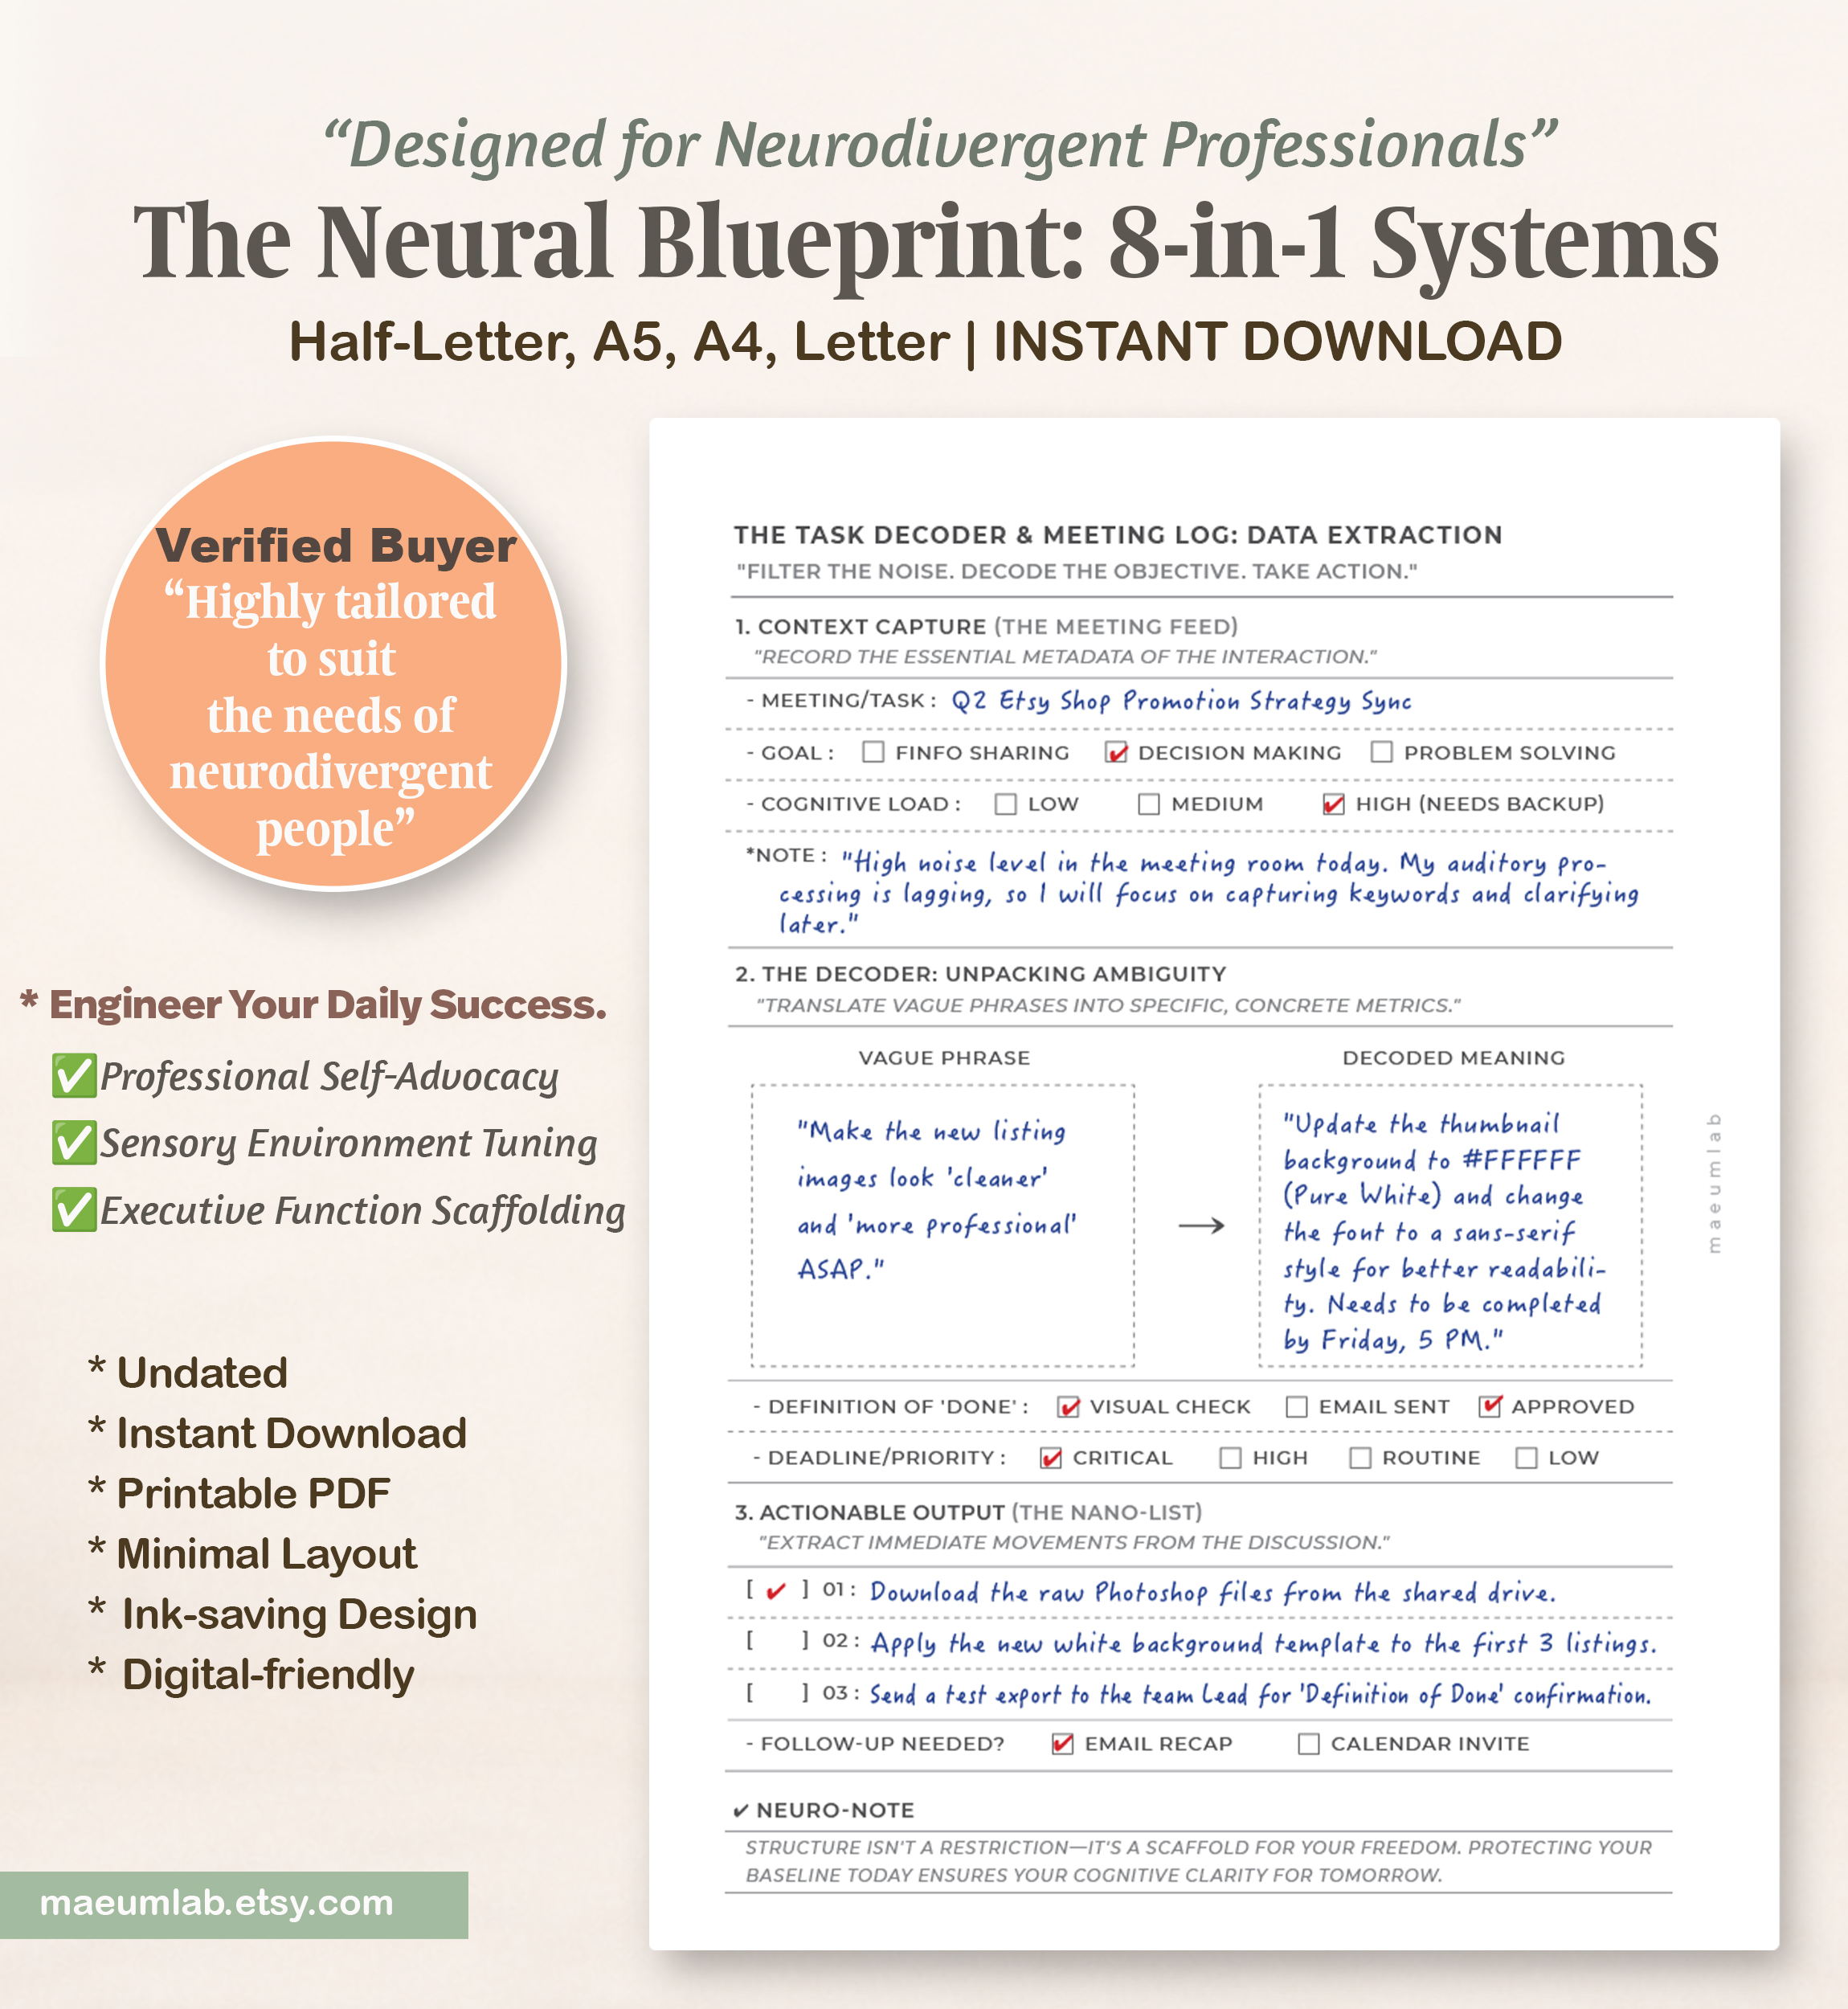
The Task Decoder & Meeting Log helps you capture what matters during a meeting or work conversation — and translate unclear information into something you can actually act on.
Begin with Context Capture. Record the meeting or task, its main purpose, and the level of cognitive demand. You can also note anything that may have affected your ability to process information in the moment.
Next, use The Decoder to translate vague phrases or broad expectations into specific instructions. Clarify what the finished result should look like, when it is needed, and how important it is.
Then move those decisions into the Actionable Output section. Instead of leaving a meeting with a page full of scattered notes, identify a few concrete next actions and record any follow-up that is needed.
When to Use It
- During or immediately after meetings
- When instructions feel vague or open to interpretation
- When you leave conversations wondering, “What exactly am I supposed to do next?”
The goal is to leave the conversation with clarity — not just more notes.
Unstuck Map: I know the task, but I can’t get started.
Task Decoder: I’m not completely sure what the task actually means.
7.Sensory Environment Map
Identify sensory friction and shape your environment around the way your brain works.
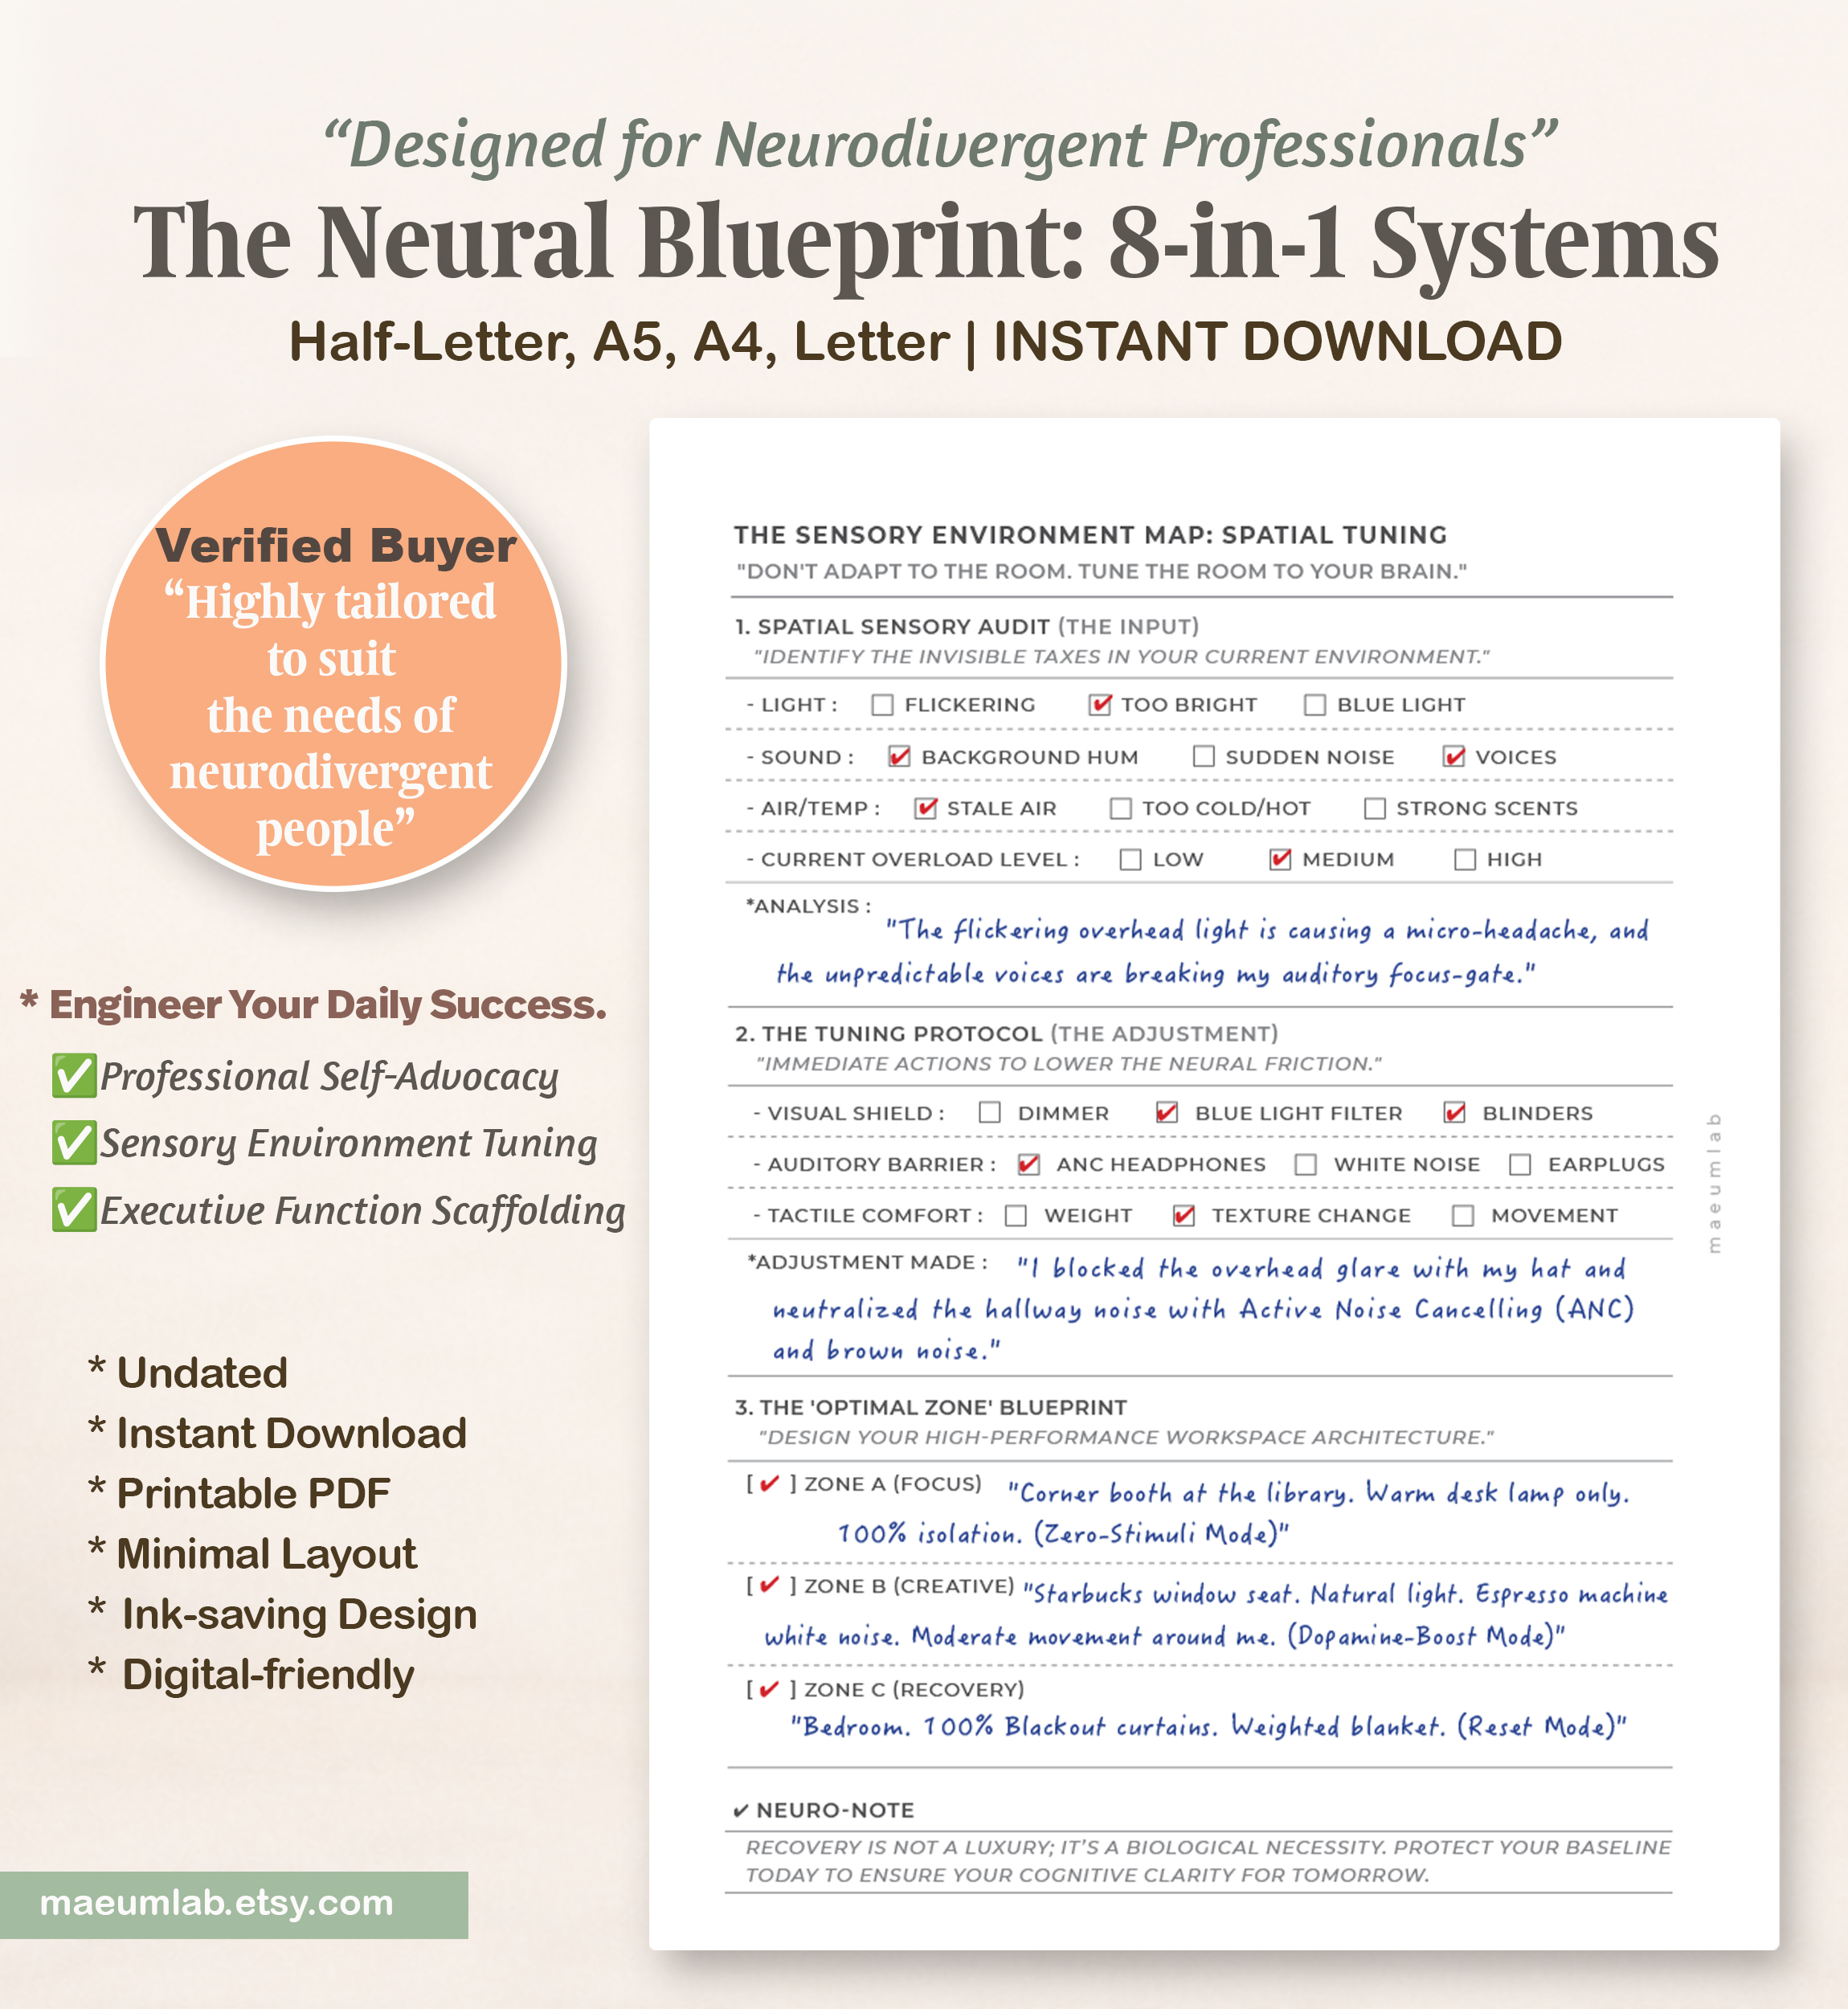
The Sensory Environment Map helps you identify environmental factors that may be quietly increasing cognitive or sensory load throughout the day.
Start with the Spatial Sensory Audit to notice sources of friction such as lighting, background noise, temperature, scents, or surrounding voices.
Then use the Tuning Protocol to choose practical adjustments that may make the space easier to work in — from changing lighting and reducing sound to adjusting textures or movement.
Finally, create your Optimal Zone Blueprint by identifying the types of spaces that work best for different needs:
Zone A — Focus
A space that supports concentration and deeper work.
Zone B — Creative
An environment that supports ideas, movement, and flexible thinking.
Zone C — Recovery
A lower-input space for rest and decompression.
When to Use It
- When you can’t focus but the task itself doesn’t seem to be the problem
- When certain rooms or workplaces consistently feel draining
- Before setting up a regular workspace
- When you want to understand which environments support focus, creativity, or recovery
The goal isn’t to force yourself to tolerate the environment — it’s to identify what you can adjust to make the environment work better for you.
8.Recovery Protocol
Step away from overload, reduce input, and return at your own pace.
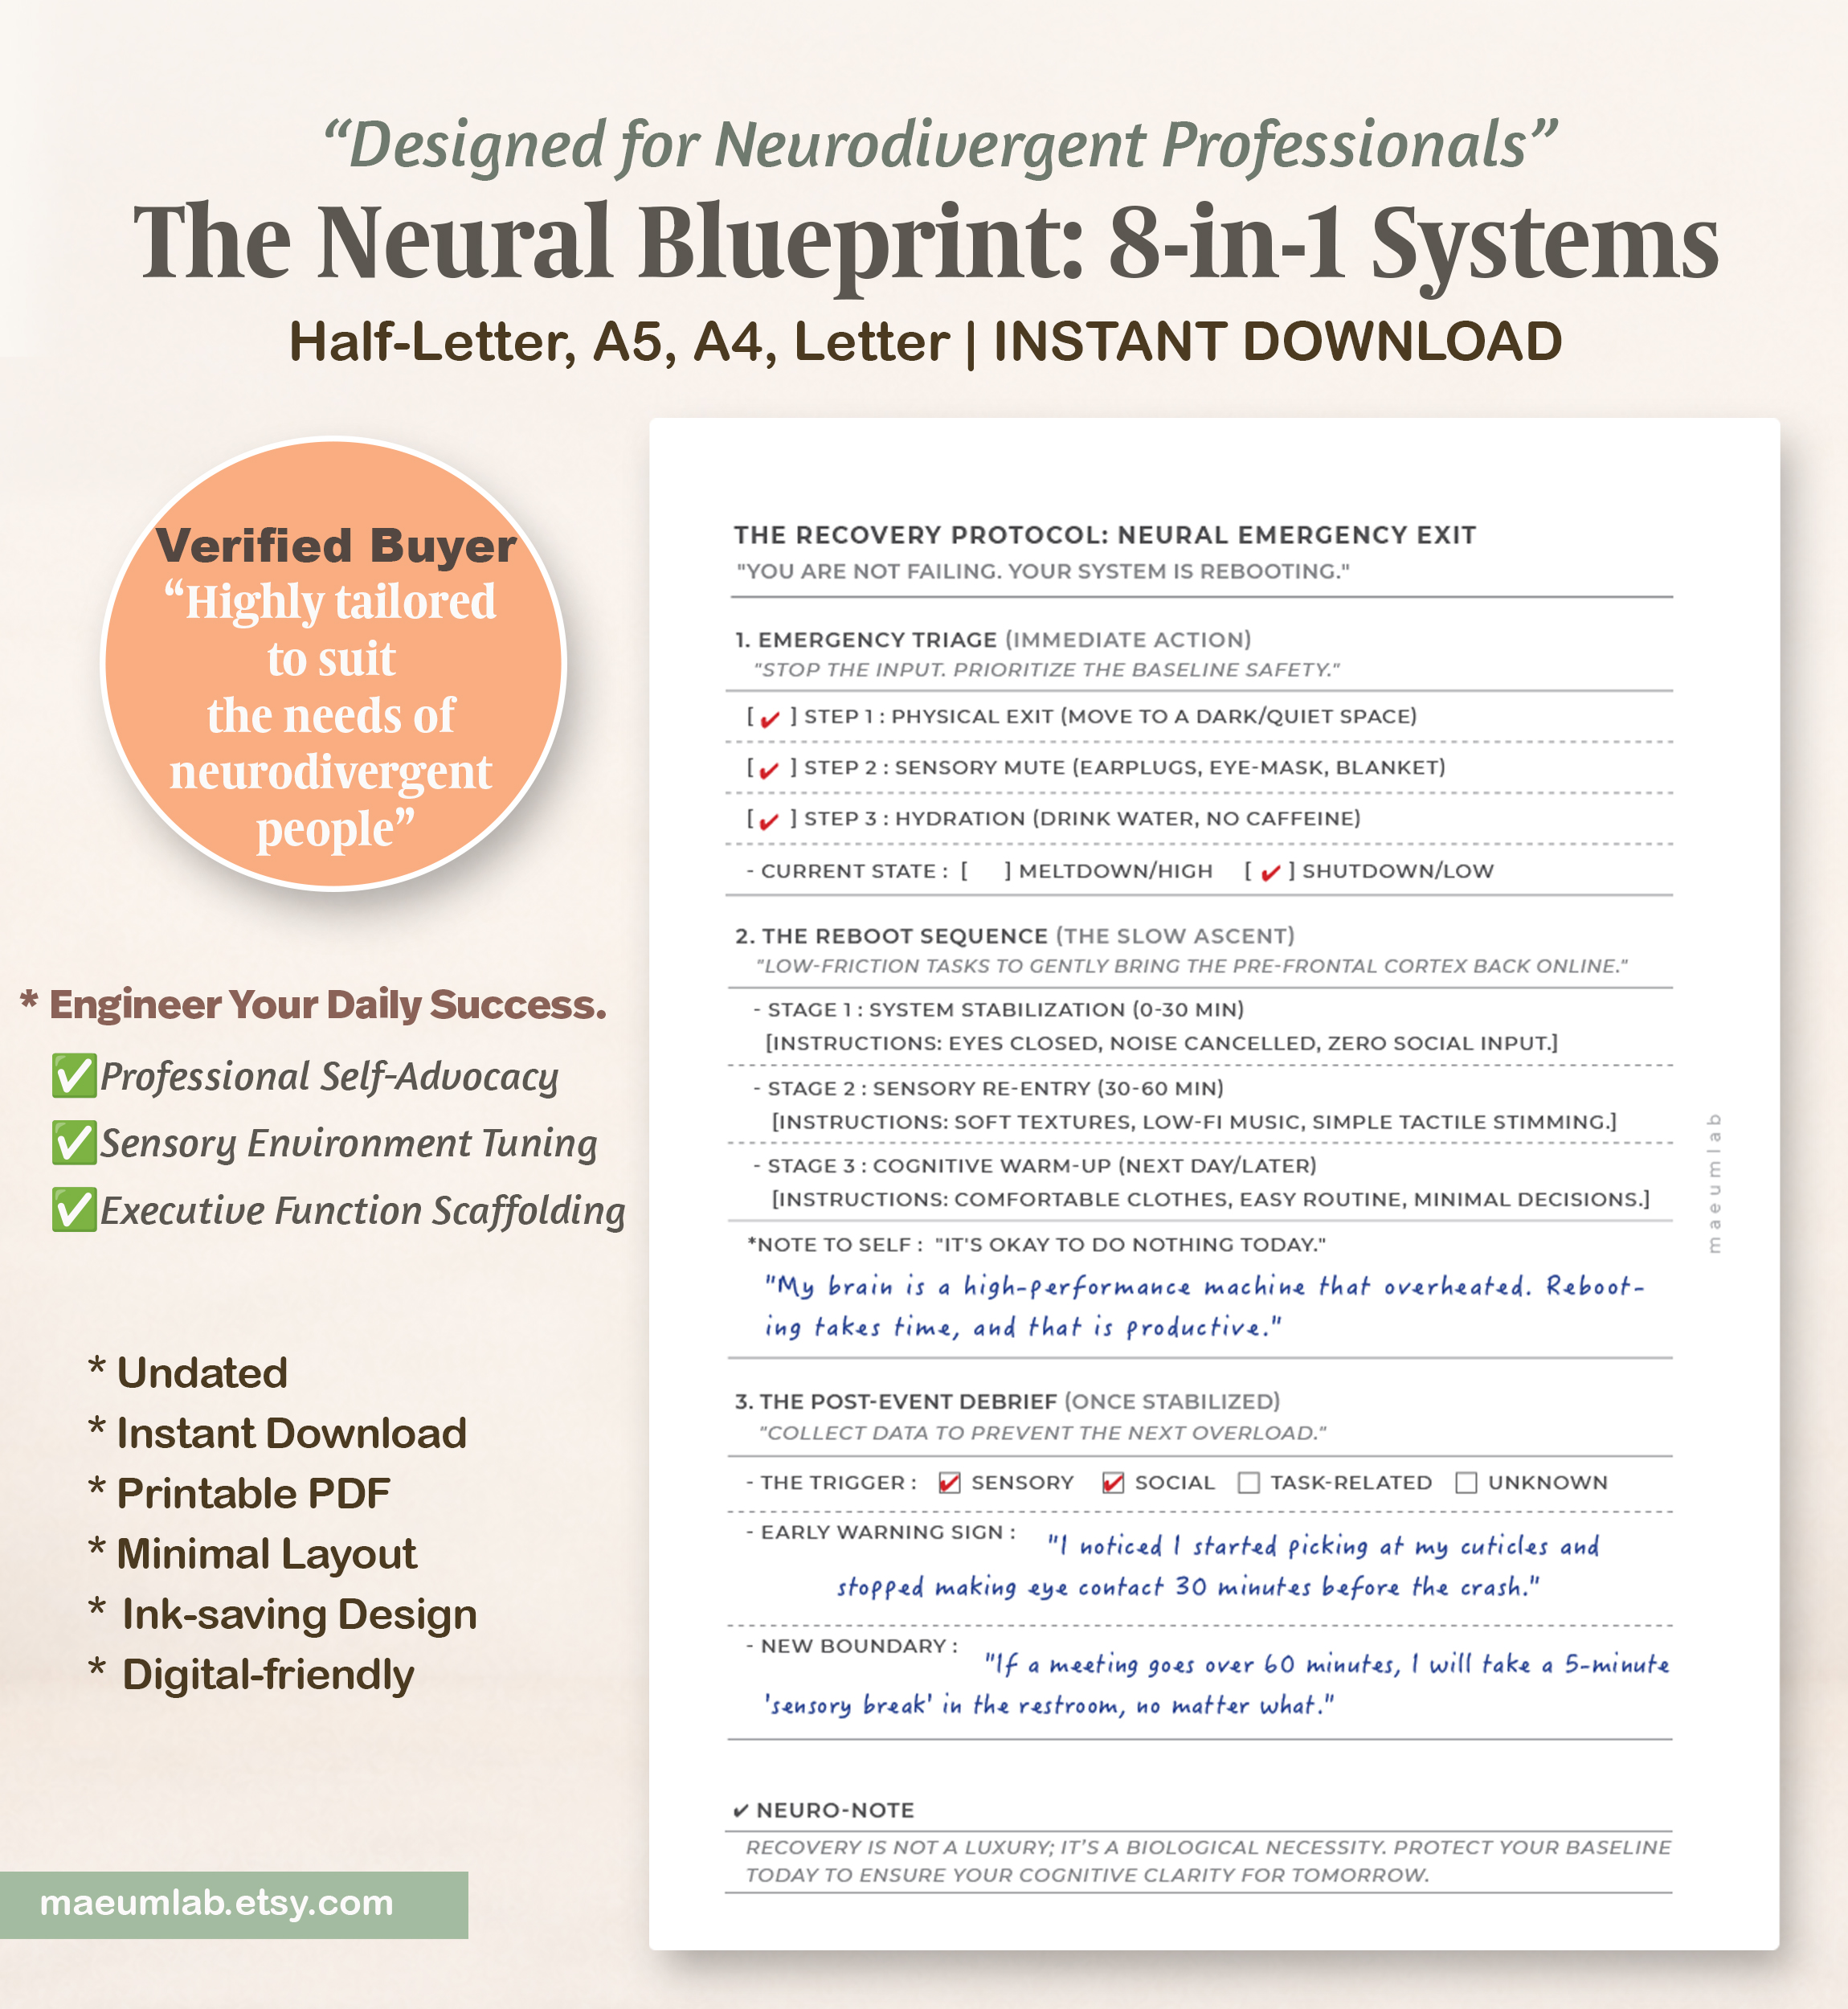
The Recovery Protocol provides a structured way to respond when sensory, social, or cognitive demands have become too much.
Begin with Emergency Triage to reduce immediate input and identify your current state.
Then move through the Reboot Sequence — a gradual, low-demand approach designed to support rest first, sensory re-entry second, and cognitive tasks only when you’re ready.
Once you feel more settled, use the Post-Event Debrief to identify what contributed to the overload, notice early warning signs, and create a boundary that may help next time.
When to Use It
- When sensory or cognitive overload becomes difficult to manage
- When you need to stop rather than push through
- After an especially demanding work or social day
- When you want to identify patterns behind repeated overload
- When planning boundaries or adjustments for similar situations
The goal isn’t to get back to productivity as quickly as possible. It’s to reduce demands, recover, and learn what your system may need next time.
USE IT YOUR WAY
You don’t need to use all 8 tools at once.
Choose the page that matches what you’re navigating today.
Return to the same tools as often as needed, and use your notes to notice patterns over time.
There is no perfect order — the system is designed to adapt to you.
MaeumLab
Practical planning tools designed for neurodivergent minds.
Explore more printable support systems, planning tools, and resources at MaeumLab Resource Library.